Well, it's FINALLY HAPPENING!!! After coming up with the idea in August, sending many emails back and forth between continents, researching materials, planning lessons, talking to school administrators and teachers and getting a grant funded to pay me for teaching time, I FINALLY got to do my Madagascar Mural Collaboration art residency!
In case you missed previous blogs about this, click here to read about the forming of the idea, or read the rest of this paragraph. This all started last Summer, when I did an internship with the Mural Arts Program in Philadelphia. There, I learned that you can paint on a specialized fabric and then install it on any wall you want. I have been working in schools doing residencies that involve painting murals permanently on the school wall(s). But after learning this new technique, I had the idea to have my students paint a mural on this special fabric then ship it to Madagascar (where I was a Peace Corps Volunteer 2008-2010) to be installed. There has been a recent push for Peace Corps Volunteers to organize the painting of murals in their villages that double as public art and health teaching tools around the subject of Malaria prevention. The mural I am having the students paint is based on care and proper use of mosquito nets (a form of Malaria prevention). When it arrives, a current Peace Corps Volunteer will install this mural on the wall of the hospital in their village. There is text on the mural explaining the pictures, but the pictures are really important because of the high illiteracy rates in the rural village. We left some pieces of the mural unfinished, so that the villagers who will eventually have it on their hospital, can finish it. This makes the project a collaborative mural between American and Malagasy people.
This Madagascar art residency was done with almost 90 4th graders at Holt Elementary School over the last 7 days. During this week, we have been studying Madagascar, doing art lessons related to the country's flora/fauna, and working on the mural.
Before beginning the residency, I showed kids a little slideshow with some basic facts about Madagascar, and some pictures I took while I was there....followed by a long Q&A session with the kids. I got, "How do they go to the bathroom?" "What was the weirdest thing you ate there?" "Were you scared all the time?" etc.
The first day, we made "passports". These were just little blue and white construction paper booklets that acted as the kid's journals for the residency. Every new fact, and every new Malagasy word they learned, got written in their passports. They even drew eagles on the front, and filled out their info on an inside page, complete with tiny self-portrait "passport photos". Super cute.
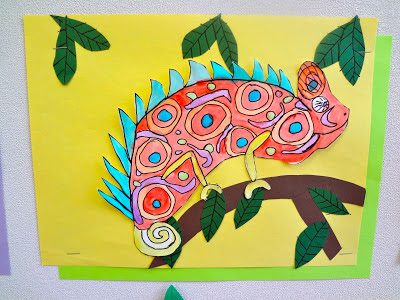
The first 3 days of the residency, after making the passports, we did an art project about chameleons. All kids worked on their chameleons in the classroom, while I periodically pulled a few kids aside to work on the mural. If you want to learn how to do the chameleons lesson with your kids or students, read on!
CHAMELEONS LESSON:
You need:
-watercolor sets and brushes
-yellow construction paper, brown strips of paper, half sheets of green paper
-skinny black "Teacher Pens" as the kids call them. (Felt tip markers)
Day 1:
(The first day, we spent half the class making passports, so this part and the Day 2 step may actually be combined). This day, we did a step-by-step follow along drawing of a chameleon in pencil on white paper. The kids draw, as you draw. Show them how to make a "jelly bean" shaped body, then add a triangle head, legs, back spikes, etc.
Day 2:
This day, break out the watercolors, and have the kids paint those suckers. Show some pics of real chameleons to get them inspired by their colors, patterns, etc. These have to dry overnight.
Day 3:
Outline and draw designs on them with the felt tip pens. Cut out the chameleons. Use the brown strips and green half sheets to make leaves and branches. Have them arrange everything on the yellow backgrounds, and paste down. Remind them that it will help make things look more dimensional if they overlap a few leaves on top of their chameleons. Done and DONE! So cute, right?!
Thanks for reading, and check back soon for the rest of the week's Madagascar projects!
Corie


I found your blog site on google and test a couple of of your early posts. Continue to keep up the superb operate. I simply extra up your RSS feed to my MSN News Reader. Looking for ahead to studying extra from you in a while!… casino real money
ReplyDelete