Friday, February 22, 2013

Civil Rights Mural Progress

Our Civil Rights Mural is really coming along!  Take a look at these kids working away in the photos below.  

We've been working on this for 7 days after school now, and I am SUPER impressed by their energy and talent.  These kids have been working with a couple teachers to put on an assembly to celebrate Cesar Chavez.  They've booked speakers, ordered t-shirts and motivated each other to come in and paint with me everyday after school for this accompanying mural project.  At the assembly, the kids and teachers will present their work to their school. 

I must admit though that the phrases "I can't", "I'm not an artist", "Am I doing this right?, "You could do it better!" come up more in these higher grade levels (this includes Middle School), than with the Elementary kiddos.  It can be tough as an art teacher to think of good responses to these types of comments from kids.  I just try to stay encouraging and make sure to keep pointing out the SPECIFIC things that I see them doing well.  I think that's the key: not just saying "oh, nice job, I love it!" but saying things like, "that hi-light color really brings out his eyes now" or whatever it is.  The other thing I like to constantly remind kids when they are self-doubting or self-deprecating, is that to do anything well takes a LOT of practice.  It took me years and years of crappy paintings and crappy drawings to be able to do what I do now (which can still turn out crappy even still!).  You have to be patient with yourself whenever you're learning something new. 

Enjoy and stay tuned for pics of the final mural!

civil rights mural, cesar chavez mural

civil rights mural, cesar chavez mural, women's rights mural

civil rights mural, cesar chavez mural, women's rights mural

civil rights mural, cesar chavez mural, women's rights mural

civil rights mural, cesar chavez mural, women's rights mural

civil rights mural, cesar chavez mural, women's rights mural

civil rights mural, cesar chavez mural, women's rights mural

civil rights mural, cesar chavez mural, women's rights mural

Sunday, February 17, 2013

Idea Mapping/ Visual Brainstorming

After the last few weeks at Walterville Elementary (see the flurry of posts before this one), I moved immediately on to my current school: Junction City High School.  I am working with the kids in their after school program, to put together a mural about Civil Rights to be installed in time for their annual school celebration of Cesar Chavez, the Latino-American worker's rights advocate.  

Facilitating teachers and I set up a time to meet with involved students to discuss their mural.  The day of our meeting, the students were SO enthusiastic, creative, and ambitious! Exciting!

Here is the process I like to go through to help people figure out what they want out of a mural, and some images to start designing with.  Here's how we did it:

Idea mapping, brain storming, visual brain storming
 I started out by asking the students to give me ONE WORD that would describe what they wanted their mural to be about.  They settled on "Equality".  I wrote that word in the middle of the chalkboard, and circled it.  I asked them to name some names of Civil Rights workers that they wanted to include in the mural.  They came up with MLK Jr., Nelson Mandela, Cesar Chavez of course, Gandhi, Susan B. Anthony, Rosa Parks and Abraham Lincoln.  I put each of those up as bubbles branching from the center equality bubble.  Then, I asked students to think of some key images that could tell the story of each of these people's accomplishments.  Those became smaller bubbles branching out from their respective people bubbles. Our idea map was beginning to fill out.

What were they trying to say with all of this? I went into my little speech about how murals are a great way to teach others about something, say something publicly and tell a story through pictures.  What did they want to tell current and future students about these people? They said the purpose would be as a reminder to fight for good things non-violently, a record/memorial piece for these people, and a teaching tool about who they were.

Once we got all the ideas on there, I asked the kids about how they wanted to organize all this information.  The first thing they did, was get rid of Lincoln and Rosa Parks. They decided it was too much, and Lincoln wasn't really into non-violence.  One girl had the idea to have protestors as a consistent element all the way across the mural, but changing according to whoever they were next to. For example, the protestors next to Chavez would be holding signs that said different things than the protestors next to Susan B. Anthony.  Genius!!  And of course, there would need to be portraits of all these people, with maybe the images that represented them behind their heads.  So many good ideas.  I went home and played around on Photoshop to combine their ideas into the sketch below:

Civil Rights Mural

My contribution, was the idea to have each person's section divided by different monochromatic color schemes.  All the way around the border of the mural, there will be quotes from the leaders.  The mural will be 4'x16'.  I'm so excited about this project!  Check back here soon to see how it's been going!!

Saturday, February 16, 2013

Oregon Mural with Walterville Elementary

My last few posts have been full of lessons and projects from my lastest residency at Walterville Elementary.  But we also had a main attraction at the Corie-art-room-takeover: an 8'x20' mural!!  Here's how it worked:
----------------------------------------------------------------------------------------------------

This mural project was created with all 190 students, grades K-5 at Walterville Elementary School in Walterville, OR.  The process was typical of a mural residency with me and went as follows:

• Initial planning meeting with staff to discuss their ideas for the residency and mural theme.  They decided on an "Oregon" theme. 

• Teachers had every student make drawings depicting their ideas of Oregon, and sent them all to me!

• I took all student's drawings and took inventory of the images and incorporated their ideas into an overall mural design. 

• We completed the mural in a little over 2 weeks.  Each classroom got to have about 8 sessions with me, and most children painted on the mural multiple times.  I taught grade level appropriate lessons for each class to work on, focusing on the techniques of master artists throughout history.  While students were all working on these projects, I rotated small groups of children to paint the mural. 

Here it is, in a few pictures.  I can't wait until the panels are installed onto their wall so I can show you the whole thing, put together!  Keep an eye out for that in the next few weeks ;)
Murals with Kids
Showing the kiddos how to lay paint down

School Murals
Putting apples in the apple orchard!

School Murals
Stayin' busy making Jim Dine-style Valentines while a couple painters are going in the background.

School Murals
Making a starry starry night (heh, art teacher pun for the win!)

School Murals
Cutest ever.

School Murals

School Murals
So many trees!!

School Murals
Adding architectural details to the city

School Murals
Done! But not yet installed. This is only about 3.5 of the 5 panels we made.

School Murals
From Left to Right:  Oregon Coast--> River--> Rural Oregon--> Forest-y Mountains--> Cityscape

Tuesday, February 12, 2013

First Grade Cityscapes

This lesson was the first grader version of this self portrait lesson that I did with all the older kids (grades 2-5) during my last residency.  I figured that we'd use all the same materials and techniques, just with a different subject matter.  Not that first graders couldn't do self portraits, but probably not the proportions lesson that I went through with the older kids. Anyway, here's what we did:

Materials:
• white paper
• star sequins
• sharpies in dark colors
• "bleeding" art tissue cut into small squares
• paper scraps for windows and half sheets of black (cut the long "hot dog" way)

1.) Have kids draw "space-y" things in sharpie on their white papers. Planets, spaceships, stars, etc. etc. Pretty cute to see what they come up with here. 

2.) Have them lay out their tissue paper squares over their drawings. Come around and spray water on the finished ones. Peel off tissue paper. If it's not colored enough, this process can be repeated, for a more saturated, layered effect. 

3.) When these are dry, show a couple cityscape examples and talk about shapes they could use for their skyline silhouettes. Hand out a half sheet of black to each kid and have them draw and cut out their city skylines in one piece if they can. Glue little windows onto them, and add sequins in the sky if you want. Super cute!

Cityscapes for First Grade

Cityscapes for First Grade

Cityscapes for First Grade

Cityscapes for First Grade

Cityscapes for First Grade

Saturday, February 9, 2013

Collaborative Mural Project for Kids

One of the things I've learned lately about teaching, is that the better I lay out expectations FIRST, the better everything goes afterwards with students.  It sounds obvious, but it's so key.  Anyway, one of my expectations when doing a school-wide mural with kids, is TEAMWORK and COLLABORATION. Those are the biggies.  Kids are expected to work together on the mural, and respect each other's ideas and contributions, for it all to come together. They might not get to paint the "coolest" or "best" part, or at least not on their own.  It's everyone contributing to the whole, that makes it look nice in the end. 

So to drive this point home, this was the first project I did with my most recent group of students. A collaborative mural....but in paper!  This school's mission is about these 5 "Heart Skills", as they call them: Teamwork, Empathy, Honor, Accountability and Respect.  Here's how we did this:
1.) First day: I had every student k-5 draw their self portrait on a 4.5 x 4.5" square. 
2.) After that, if kids finished early, they were allowed to go over to our big butcher paper and paint designs with tempera around the words I had written in black paint. 
3.) I glued every kid's self portrait down around the words.  The kid's designs and colors peek through as the background.  

** If I were to do this over again, I would have made it an even bigger piece of paper so that we could spread the portraits out a little more, and see more of the painting underneath.

This is SO worth it to do with kids.  This is getting them ready to work TOGETHER, and turns out ridiculously cute and awesome. Also, nice enough to laminate or mount and hang somewhere as a mural in it's own right!

Happy paper mural-ing!

Corie

Collaborative kids mural, collaborative art project

Collaborative kids mural, collaborative art project

Collaborative kids mural, collaborative art project

Collaborative kids mural, collaborative art project

Collaborative kids mural, collaborative art project

Friday, February 8, 2013

Self Portraits With Borders!

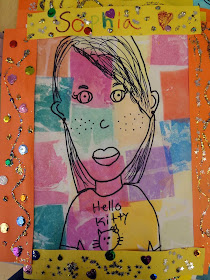
I just LOVED how these self portraits came out.  One of my favorite parts of doing an extended residency at a school, rather than a quick one day lesson or workshop, is the fact that there is so much more time to complete a project. These kids learned the proportions of the face, traced their portraits in sharpie, and colored them with bleeding art tissue paper all in one 45 minute session. (Check out the post on how to do that part here).  We let these dry, then the next day, were able to add and decorate these borders.  Sometimes it's worth it to just put out a bunch of fun materials that kids don't get to use very often, and see what happens. For our border sessions, I put out sequins, glitter (which I - along with every other teacher on the planet - have a love/hate relationship with), stamps, and markers. I told them they needed their names on them, but the rest was up to them to decorate. Oh man, those 2 days we finished this project, I could rest assured that each child was carrying glitter wherever they went just like the viciously infectious colds and flus going around. That stuff was EVERYWHERE. A kind teacher brought in a broom for me, and I (mostly) was able to take care of it. It was the chunky kind, so it sweeps. Just TRY to get the fine stuff off of something. I dare you. We had a great time with these. Below are a sampling of kids grades 2-5. 

Enjoy, and go bravely forward with glittering!

Kids Self Portrait Lesson

Kids Self Portrait Lesson

Kids Self Portrait Lesson

Kids Self Portrait Lesson

Kids Self Portrait Lesson

Kids Self Portrait Lesson

Kids Self Portrait Lesson

Kids Self Portrait Lesson

Thursday, February 7, 2013

Kids draw the funniest things


The other day I had a 4th grader draw this when he finished a project early.  When I asked him what it was, he said: "A kitten-dragon laying a dinosaur egg." 

funny kid drawing, dragon drawing

I love my job. 

Jim Dine Valentine's Day Art Lesson


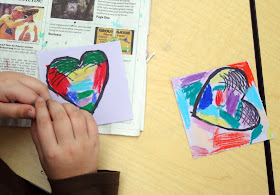
There are a lot of Jim Dine inspired Valentine's Day art projects out there.... here is my version. Enjoy! This is a great lesson especially for littler ones (K-3), but 4/5ers have fun with it as well. 

Supplies:

• Oil Pastels
• black markers (we used sharpies)
• small pre-cut squares in whatever color (I think these are 4" x 4")
• red construction paper

Lesson:

• Talk about Jim Dine and the Pop Art movement (Pop Artists wanted to sort of rebel against abstract art, and start painting things that everyone could recognize - celebrity portraits, everyday objects, etc.)  Show some of his artwork, especially focusing the slideshow on his heart pieces!
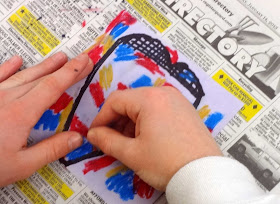
• Have kids draw outlines and shading on hearts with markers. Show kids how to "cross-hatch" for the shading on the top of the heart. Emphasize the thick outline of the hearts.
• Color in little patches of colors in many colors of oil pastel all over inside and outside their hearts until they cover their whole squares.
• Once both squares are done, glue them both to the front of a card folded "hamburger style". Voila! They can write in them to someone in their families - (good opportunity for a writing assignment here!)

Happy Valentine's Day!
Jim Dine Valentine's Day Art Lesson

Jim Dine Valentine's Day Art Lesson

Jim Dine Valentine's Day Art Lesson

Jim Dine Valentine's Day Art LessonJim Dine Valentine's Day Art Lesson


Tuesday, February 5, 2013

Monet Waterlilles Art Lesson

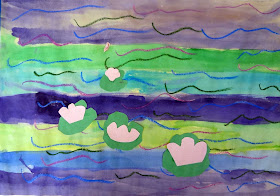
I just did this lesson last week for grades 1-5 and guess what? They ALL turned out cuter than cute!  I think this is a lesson that every student can be successful at.  That particular point is something I've been  trying to work towards in my lesson planning.  A good art lesson it seems, is simple enough that any student in the class can complete it and have it look decent.  It should also allow enough creative choices so that the more artistic students in the class can take the lesson and run with it.  Hard to balance, but I'm learning, slowly but surely.  This was a fun one.  And Monet is so classic you can't go wrong.  Here's how I did it:

Day 1: 
• Show pics of Monet's waterlillies - talk about THIS: Two inventions around the time of Monet really changed the art world and influenced what he was doing:
-#1: THE CAMERA - Now artists could branch out beyond super realism because a camera could do that for people now.  Hence, Impressionism. 
-#2: PAINT IN TUBES - Now, artists could bring their paint outside the studio, and paint out in front of their landscape subjects.
• Draw with COOL COLOR oil pastels (good opportunity to review the color wheel)...small strokes like monet, horizontal "water-y squiggles".
• Paint over it with COOL COLOR watercolors. 

Day 2:
• Explain basic PERSPECTIVE: Things get smaller as they get further away from you.  Their waterlillies should try to follow that rule. Have them make big, medium and small lilliepads and waterlillies out of construction paper, and arrange them with this perspective rule in mind, to give the pictures more depth.

Have fun!

Monet Art Lesson for Kids

Monet Art Lesson for Kids

Monet Art Lesson for Kids

Monet Art Lesson for Kids

Monet Art Lesson for Kids