Sunday, April 28, 2013

Spring Garden Porch Banner Mural

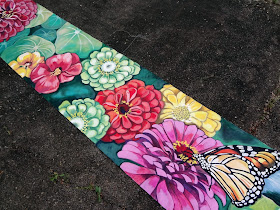
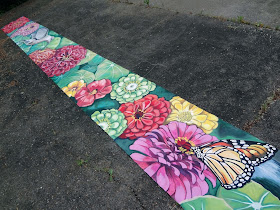
Here it is, the 40-foot banner mural I've been working on for the last few weeks! :)  The clients who commissioned this piece have a second story balcony running along the entire length of their house.  This banner was made to be hung over the railing on special occasions, for when guests come over, or just on sunny Spring days :)  The idea was to have a mural that could go up when they were in the mood to celebrate, for whatever reason.  The client and his partner love to garden, and mentioned Zinnias and Nasturtium flowers....and they are NOT afraid of bright color.  Perfect for me!  Even with a crazy month, I was able to pull this one off in time for them to use it to welcome guests to their big upcoming potluck :) It was a tight deadline, but I took the challenge, and feel good that with some strategic planning, was able to pull it off. 

I had a lot of fun painting this one.  This opens up a lot of possibilities for me and clients, too.  It makes for a mural that people can take down and put up as they please, if they're not ready for the commitment of a mural directly on the wall, or if they want to have a mural on an area that would be un-paintable.  It also opens up the possibility for me to work with clients out of my local area.  As long as I can get the measurements and concept ideas, we can work together over a distance!

I can think of no mural more Spring-appropriate than this one, and it was a nice way to ring in the season :)
large floral mural, floral banner mural, eugene oregon muralist, bright flower mural

large floral mural, floral banner mural, eugene oregon muralist, bright flower mural

large floral mural, floral banner mural, eugene oregon muralist, bright flower mural

large floral mural, floral banner mural, eugene oregon muralist, bright flower mural

large floral mural, floral banner mural, eugene oregon muralist, bright flower mural

large floral mural, floral banner mural, eugene oregon muralist, bright flower mural

large floral mural, floral banner mural, eugene oregon muralist, bright flower mural

large floral mural, floral banner mural, eugene oregon muralist, bright flower mural

large floral mural, floral banner mural, eugene oregon muralist, bright flower mural

Wednesday, April 24, 2013

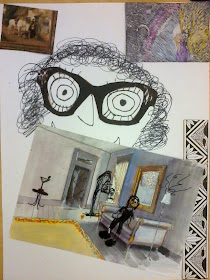
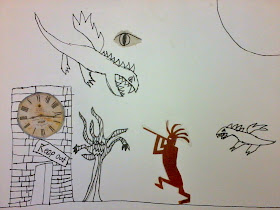
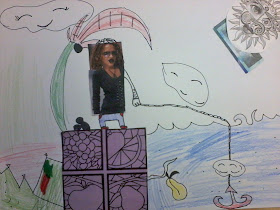
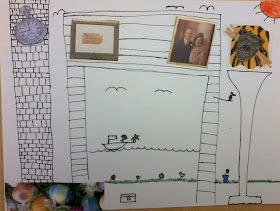
Dali Collage Art Project for K-5

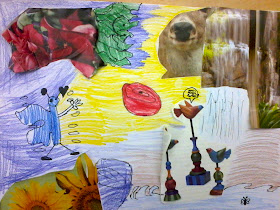
When I was in High School, I was obsessed with Salvador Dali.  He is still one of my favorite artists!  I so was excited to show him to my 3rd graders!  Read on to see how we made our Dali collage art projects:

1.) Talk about it: Show a slideshow of some Dali artworks and have kids share what they observed about them. Ask, "Why do you think Dali got famous? What is he doing differently?" 
 Talk about “Surrealism” and how it is unique the way Dali painted realistically, but his subject matter was not realistic.  Ask the question "Do his paintings look real?" and you will get some "no" and some "yes" answers.  It's kind of a trick question.  He's painting things that are dreamy and not realistic, to look like they are actually real.  Tell your students they are going to make silly, dream-like pictures, using their imaginations and creativity.

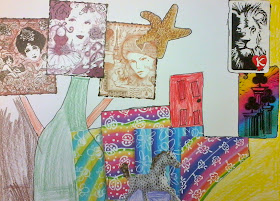
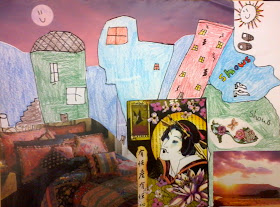
2.) Give them magazines and/or cut out pictures from them (I was lucky enough to score a huge box of magazine pictures, most already cut out perfectly, from a local organization that collects and distributes and sells recycled art materials. MECCA, in Eugene, OR.)  Tell kids to pick 5 picture pieces only, arrange them on their paper, and glue them down.

3.) Give kids super fine sharpies, and let them "finish their pictures" and draw around the cut outs to create surreal situations.  No words, only pictures!

4.) Color with colored pencils. Voila!  Loving these.  Not the most aesthetically pleasing kids art project I've thought of, but it really exercises the creativity muscles, and gets them to think outside the box, and think silly.  It's super fun for them, too. Enjoy!!

~Corie 

Dali art project for kids, Dali collage project

Dali art project for kids, Dali collage project

Dali art project for kids, Dali collage project

Dali art project for kids, Dali collage project

Dali art project for kids, Dali collage project

Dali art project for kids, Dali collage project

Dali art project for kids, Dali collage project

Dali art project for kids, Dali collage project

Monday, April 22, 2013

Spring Bird Drawing Collage

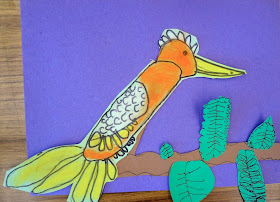
Lately I've been teaching a residency at Dos Rios Two Rivers Elementary in Springfield.  We've been making some art for the kids to keep, and some to sell at the upcoming art walk (they're having a section for local schools to sell kid art to fundraise).  This is our last project, and I must say, they are turning out super cute!  I made these with Kinder through 5th graders, and adjusted for complexity, depending on grade level.  Read on to see how we made them!

spring art project, bird art project, kids spring art project, bird drawing project
Step #1: Lead a step-by-step drawing of a bird.  Start with pencil, trace with thick sharpie.  We actually had both the thick and thin sharpies available, so for the older kids, I had them outline in thick, and trace all the inside lines with the thinest sharpie. This looks really cool....see below.  

I had the littler kids draw birds like the above, and the older kids draw the more complicated tropical birds like you see below. With a couple of the classes, we opted for drawing chameleons instead of birds, which the kids really got into. Need to take some pictures of those....

spring art project, bird art project, kids spring art project, bird drawing project
Step #2:  Next, have the kids color these in with soft chalk pastels.  I told them no black brown, or the super dark blue (these covered up the sharpie lines, whereas the brighter, lighter colors don't).  Show them how they can blend them, and how the sharpie lines show up again when they do.  

spring art project, bird art project, kids spring art project, bird drawing project
..... No need to stay in the lines since they will be cutting them out anyways.

spring art project, bird art project, kids spring art project, bird drawing project
DAY 2: We did this next step the next day. We needed 2, 45 minute sessions to get through the whole project. The next step is to make some leaves and branches, cut out the birds, and paste it all together!! 

spring art project, bird art project, kids spring art project, bird drawing project

spring art project, bird art project, kids spring art project, bird drawing project

spring art project, bird art project, kids spring art project, bird drawing project

spring art project, bird art project, kids spring art project, bird drawing project

spring art project, bird art project, kids spring art project, bird drawing project


Tuesday, April 16, 2013

Yachats Beach House Mural

This last mural project had some serious perks.  I got to stay at a beach house in Yachats, OR. with an ocean view for 2 nights, while I worked on the mural for their mud porch!  I brought my Dad along, who is a watercolor artist, so he could paint too!  It was great to have him there... good company and also another artistic eye to bounce things off of.  Love you Dad! (I know you're reading this.) At the end of the weekend, here's what it looked like:
BEFORE:

The approved digital collage/sketch done in photoshop.... 

And AFTER:


Painted shadows for all the objects for the beach...

REAL shells, driftwood, beach glass, agates glued onto the wall!!!


A few painted "shells" in the background to blend into the real ones glued on.
This one was really a lot of fun to do.  Not only was it fun to paint, but figuring out the 3-d and textural elements for the mural was exciting for me.  After sketching the design on the wall, I brushed a bunch of granular acrylic gel (basically just clear paint with sand and chunky stuff in it) onto the sand and beach area.  This stuff dried to a bumpy, sandy finish. Then I painted the sand colors over it, and added the shells and rocks and driftwood at the very end.  The mural is so much fun to touch!! Loving the idea of blending 2-d with 3-d.  

The vacation rental owners had a very positive reaction to seeing the mural. The honor and pleasure of turning someone's vision into reality, and transforming their space, is what gets me excited about painting murals for clients.  It can be really difficult to get inside a client's head, and try to filter their feelings, thoughts and words through my own brain, to still get an image they want in the end.  It's what unique, custom, tailored-to-you murals are all about - asking the right questions to find out what the client wants, and then giving it to them.


Friday, April 12, 2013

Easy Perspective Lesson - Mother's Day Cards

Just in time for Mother's Day (it comes up, quick!!), here is a great card idea.  In the school I'm working at right now, we are preparing for next month's art walk event, which will feature student artwork for sale as a fundraiser for their schools.  The principal thought notecards would be great for this and I totally agree! Not everyone wants to hang a stranger's kid's artwork on their wall, but who wouldn't want to send their "thank you's" on these cuties???!!! And they're educational for the kids, too! Here's how we made them:

You'll need:
• super fine tip black sharpies
• watercolor pencils (or just watercolor if you don't have these...either works great!)
• whatever size card you want to work on, and some cut down white construction paper to fit onto them, leaving a small border. 

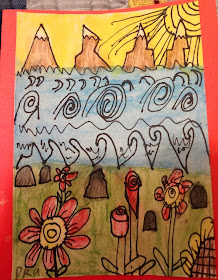
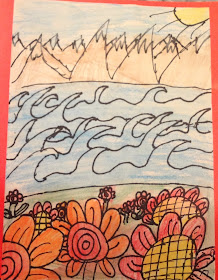
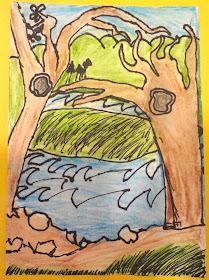
- Talk about what is a "landscape".  Show some pictures of landscapes, and explain "foreground" (everything that's closest to the viewer), "middleground" (everything a big further away), and "background" (everything that's the farthest away from the viewer). Maybe have the kids close their eyes and visualize a landscape that they know of...maybe when they're camping or hiking. This step actually helps a lot!!
- Have kids divide their papers into 3 equal parts, marking lines with pencil (in the first picture below, you can see these lines faintly). The bottom will be foreground, the middle is middleground, and the top is background. 
- Tell kids to put away their pencils and just "go for it" with their sharpies the rest of the time. This is scary to many kids (and adults!) but it's good practice to be brave in these small ways and in art. 
- You draw on the board or under a doc cam while they draw. Just give them examples and ideas of what they could draw in each section, but empasize that these will...and should....all look different. Here's what a few of the kids came up with.  Enjoy making these!!

lanscape lesson for kids, perspective lesson for kids, mothers day cards for kids

lanscape lesson for kids, perspective lesson for kids, mothers day cards for kids

lanscape lesson for kids, perspective lesson for kids, mothers day cards for kids

lanscape lesson for kids, perspective lesson for kids, mothers day cards for kids

lanscape lesson for kids, perspective lesson for kids, mothers day cards for kids

lanscape lesson for kids, perspective lesson for kids, mothers day cards for kids

lanscape lesson for kids, perspective lesson for kids, mothers day cards for kids

Wednesday, April 10, 2013

First Grade Self Portraits

First grade self portraits, kids self portrait lesson, kinder self portraits

I've been at Dos Rios/Two Rivers Elementary in Springfield all this week and last. We're making projects to take home, and some to sell at the Springfield First Friday Art Walk in May! This was their project that they were able to take home to their families: Self Portraits! For the older kids (grades 2-5) I did a more involved lesson on proportions of the face, colored with sharpie and tissue paper.... read that lesson by clicking here.  For the Kinders and first graders, we did this version you see in the pictures.  Read on to see how we did this lesson!

Supplies:
• Multicultural construction paper, cut in 6 x 9" sheets. 
• black sharpies
• colored pencils
• background colored construction paper, 9x12"
• Small-ish rectangles of pattern paper (we used both wrapping paper and contact paper)
• construction paper hair colors, cut into smaller pieces...half or quarter sheets. 
• glue sticks
• scissors

This can be done in 2, 30-minute sessions, or one longer one. 
• Day 1: Teach them suuuuper basic proportions of the face.  Just show that the eyes go in the middle of the face, and show some ways to draw eyes, noses and lips. The first day, just draw the faces on the multicultural skin color papers, trace drawings with sharpie, and add some colored eyes (and whites of the eyes!) lips, and cheeks with colored pencils. 
• Day 2: Put it all together: cut a "shirt" rainbow shape out of the patterned paper, cut out the faces, add torn paper for the hair. Glue, glue glue. Then watch the cuteness happen. Love these!!

First grade self portraits, kids self portrait lesson, kinder self portraits

First grade self portraits, kids self portrait lesson, kinder self portraits

First grade self portraits, kids self portrait lesson, kinder self portraits

First grade self portraits, kids self portrait lesson, kinder self portraits

First grade self portraits, kids self portrait lesson, kinder self portraits

First grade self portraits, kids self portrait lesson, kinder self portraits