Thursday, December 26, 2013

Perspective Lesson for Kids


The thing I love about tutoring kids in art, is that I can focus all of my attention on one student. I have the luxury of time and focus to making sure that my one student "gets" whatever we're working on. I can modify my lessons to suit their individual needs, wants and interests. Whatever she's into learning, I teach. Whenever she doesn't understand a concept, we back up and go slower. Ahhhhh how nice it is to only teach one kid at a time. And it helps that my student is a rockstar and a sweetheart. I will very much miss our tutoring sessions when I'm in Portland. Anyway, onto my student's favorite lesson. I was blown away that this was her favorite. Perspective had to be one of my least favorite classes of my entire college career. Didn't help that my Professor had a big rubber stamp that said, "DO OVER" that he used liberally with bright red ink on our homework assignments.... that took hours. Ugh! This lesson takes a little know-how and basic knowledge in perspective rules and techniques. But it's not that complicated. Here, I'll help:

One-Point Perspective for 4th grade and up:

1.) All you need is a paper and pencil for this one. 
2.) Give basic concept of perspective rules: Why do we use these "rules"? They help us build anything 3D on a 2D surface and make it look real. Talk about how things that are farther away are drawn smaller to trick the eye into making depth.... etc. etc.
3.) Draw a Horizon line. Talk about what this even means - it's where the sky separated from the Earth in the viewers point of view. 
4.) Draw a vanishing point. Or, if you're me, you call it "The Magic Dot". Explain that that thing is basically the point where things are so far away that they're out of view. You're making an interior, now, so draw a small rectangle, with your "orthogonal" lines as shown in the bottom picture. 
5.) Erase the horizon line. Use the Magic Dot to help build objects for your interior. Remember you will have vertical lines, horizontal lines, and the others will connect to the Magic Dot. You can even go into ellipses, and how they operate in Perspective. Give it a try. My Tutee rockstar student really got into this lesson. At first it's hard, then its freeing to know this amazing, amazing rule of drawing. Have fun!! 

Look at the amazing bakery interior that my student made!!!! Can you believe she's a 4th grader? So proud :)


perspective art lesson for kids

perspective art lesson for kids

Sunday, December 22, 2013

Environmental Posters with 4th and 5th Graders


Hello everyone!
So first and foremost, I have an announcement. In my last update post, I talked about how I was on the job hunt. Well, I found one! I'll be a Social Media Specialist and Graphic Designer for the Portland Jewish Academy in Portland, OR. I'm soo excited about this opportunity! I've been wanting to get up to Portland for awhile, since there's just so much going on there for artists. I've also been wanting to get into the Graphic Design field. It will be a great thing, I think. I'll be working half-time, but will be making enough to get by on. While of course I will need to be full-time, being able to pay my bills with part-time work initially, seems like a blessing. I'll be spending the rest of the work week trying to get my mural business off the ground in Portland. It takes a lot of time to do the networking/social media-ing/website building/business card-making, and all the rest that goes with promoting a small business. I'm excited to see what kind of new mural projects Portland will bring :) 
Since I'll be leaving Eugene in 2 weeks, I just finished my *LAST* school residency last week. This is really bitter-sweet. I have absolutely loved working for Lane Arts as a Teaching Artist. I've learned so much about teaching, and the kids have continued to make me laugh and inspire my own art work. If you are a teacher, please continue to follow my blog, as I hope to get on a teaching artist roster in Portland this coming Spring and will be posting more lessons as I create them. In the meantime, stay connected, as I'll be posting personal artwork and hopefully some mural projects as they happen. 

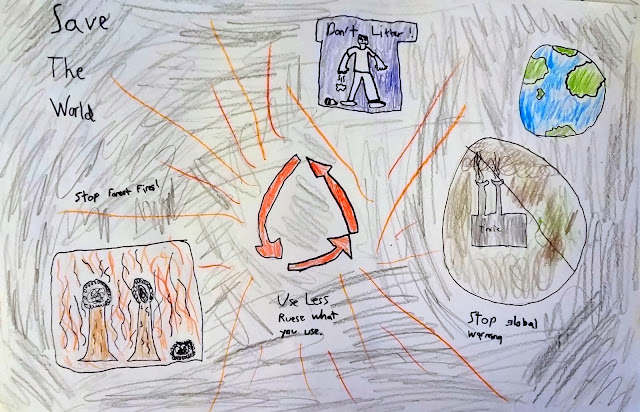
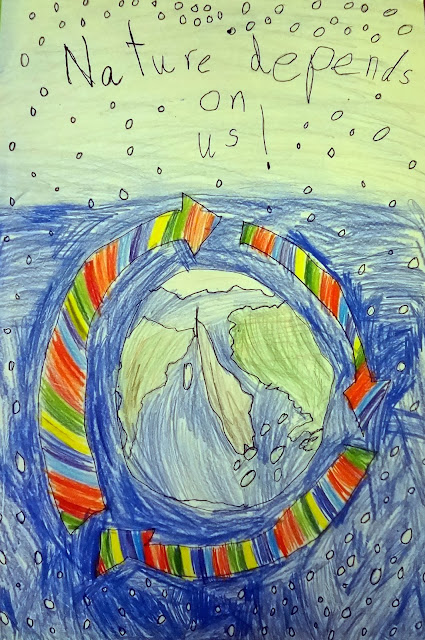
My last residency's theme was all about asking the question "Can art help save the Earth?". The 4th and 5th graders and I used that question as a base for our two weeks together during the after school program. We made a big mural with an environmental theme, and talked about how murals can be used to teach things to other people who view them, or express an opinion, or illustrate a concept. Because all 25 kids can't paint at the same time, we had other projects going while we rotated groups of painters. The poster project below was our first project. After introducing our "Big Question" about art saving the earth, we brainstormed some ways that we could use art in our own school, to help out the environment. We decided to make posters for the hallways and the bathrooms, that would help remind other kids (and teachers!) to use less water, less paper, etc. The kids could use any environmental theme they wanted though, so some of these turned out pretty funny. Anyway, I think they turned out adorable, and most of the kids really spent some time and effort on them. This would be a great Earth Day week project..... but really, do we need that as a reason? Every day can be Earth Day. :) Enjoy!

Environmental Poster project for kids, 4th and 5th grade earth day art project

Environmental Poster project for kids, 4th and 5th grade earth day art project

Environmental Poster project for kids, 4th and 5th grade earth day art project

Environmental Poster project for kids, 4th and 5th grade earth day art project

Environmental Poster project for kids, 4th and 5th grade earth day art project

Environmental Poster project for kids, 4th and 5th grade earth day art project

Environmental Poster project for kids, 4th and 5th grade earth day art project

Environmental Poster project for kids, 4th and 5th grade earth day art project

Sunday, December 15, 2013

Warm and Cool Colors "Imagination" Lesson

Hello, all! 

I promised some more lesson posts, and I'm starting with this one! I'm loving how these turned out. If you want to try this with your kids or students, keep reading!

SUPPLIES:
- tempera paints in a variety of colors
- something for the paint to go in - we used egg cartons
- multicultural construction paper (9 x 12 cut in half sheets)
- green paper
- Large (11 x 17) white paper and smaller (9 x 12) paper
- brushes, water cups

LESSON:

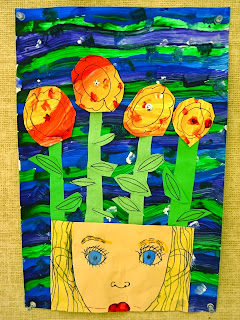
1.) Show an example that you've made of this pieces. Talk a little about conceptual illustration. Is this a picture that could really happen, or is someone using their imagination to create it? You could also show some surrealistic or conceptual illustration by other artists. Ask the kids what they think your piece is trying to "say". Why did you choose to have flowers growing out of your head? I got some interesting answers from my students: "It's about using your imagination", "Our minds are blooming", etc. They got it.

2.) Have a little talk about warm and cool colors...review them. They have a choice of having a warm background with cool flowers, or cool background with warm flowers - for contrast. Have them paint their background on the big sheet of white - just designs and patterns covering the whole paper. The smaller white sheet is to paint the flowers. They should also cover their smaller flower sheet in paint, since they will cut their flowers out of this. 

3.) They can then make stems and leaves out of the green paper, and cut out flower shapes out of their smaller painted paper. 

4.) We did a self-portrait lesson right before this lesson, so the kids already knew how to set up their guidelines for drawing their faces. They should choose their skin color out of a stack of the multicultural construction paper, and then draw a self-portrait on it. They can draw in pencil and trace in pen, and color in lips, hair and eye colors. 

5.) Glue everything together on the background paper! This whole process took us about 3, 45 minute sessions. And as always, some kids go through it super quickly, some very slowly, so plan other things for early finishers. But you knew that. Have fun!!

warm and cool colors art lesson for kids, 4th grade art lesson, 5th grade art

warm and cool colors art lesson for kids, 4th grade art lesson, 5th grade art

warm and cool colors art lesson for kids, 4th grade art lesson, 5th grade art

warm and cool colors art lesson for kids, 4th grade art lesson, 5th grade art

warm and cool colors art lesson for kids, 4th grade art lesson, 5th grade art

Sunday, December 8, 2013

Life update

Umm, wow. My last post was September 4th. Whoops! A quick little life update might be in order. And then I promise a few new kids art lessons are coming very soon, too!

Sooo how to summarize that last 3 months. Since getting back from Madagascar, Ive basically been job-searching, and here's why. While it would be my ultimate ideal to have 50% of my job be teaching kids art, and 50% of my job be painting murals for clients, at this point in my life, I've decided to pursue other paths to meet the same ultimate end-goal: being a full-time creative who gets paid to do creative things. I always hear that you should never, ever "give up on your dreams" and that you should "follow your bliss" and all of that. And in art school, you tend to hear a lot of "don't EVER sell out....man." I would say that one year ago, I was working really, really, hard at making that 50/50 Teacher/Muralist goal work out. And I still want it to happen, maybe someday. So what's changed and why am I job-searching?  I don't know how to put it any other way, other than my biological clock is ticking louder than ever. Ha! I know that at 28, I've still got plenty of time to make that happen. But, I guess I'm just realizing that I CAN still be paid to use my brain and creative energy, and also provide for a kiddo someday.... and have health insurance! As liberating as freelancing is, it wears on you. A stable, reliable paycheck would not be so bad. As fun as it is to work in a lot of different schools for a short amount of time (love the variety and changes of scenery), that wears on me, too. I'm ready for co-workers and a "work-family" that I can get to know, without having to leave them a few weeks later every time. The direction I decided to really pursue, is graphic design. Since learning Photoshop in my high school newspaper class, I've enjoyed the "techie" side of art. I like playing around with fonts and color palettes and arranging content so that it's visually pleasing. I've always made my own business cards and brochures and designed my own websites. That stuff is really fun for me. I didn't really think about bringing it to the forefront until pretty recently. I've done a little freelance work making logos, and the rush I felt, knowing my logo would be all over their printed materials and scrubs and street sign, was awesome.  This is a viable option for me, I realized. I think this will make me happy, too.  What it really boils down to, is that I am an artist who just likes the process of making art, in many different forms. I actually find I am MORE creative when given a set of constraints from a client, rather than creating something out of thin air for myself that can be anything I want it to be in the whole world.  I actually like being a commercial artist. Rarely have my mural projects been 100% concepts that I would choose myself for my own home..... but that's the whole point! My job is to get inside my clients' head and find out exactly what they might not even know they want. And then I make it for them, and it makes them happy. Whether I'm making that thing they want with paint or with a computer mouse, I think it would still be similarly satisfying for me. While that doesn't work for every artist, it works for me.  I'll never, ever stop loving the feeling of pushing paint around a canvas or wall, and if I get a full-time graphic design job, that doesn't mean I'll stop painting. But I won't have the added pressure of having that painting be something that has to make me money. That thought is incredibly liberating. So while it may seem that by working for an employer I will be giving up my freedom, it's actually gaining me a bunch of it, too.  So that's where I am right now... in the midst of job-searching madness, but still teaching and being a design intern at a local company in the meantime. Hoping to have something nailed down soon, but for now, staying busy, having fun, making stuff.

Stay tuned... next post will be more colorful, I promise ;)

- Corie

Wednesday, September 4, 2013

Summer in Madagascar

WOW, it's been a long time since I blogged. But I'm back!  Where have I been and what have I been doing, you ask?  I've been away all summer working (and playing) in Madagascar! Why Madagascar you ask?  If you're new to me or my blog, then maybe you haven't heard me mention Madagascar about 769 times.  I was a Peace Corps Volunteer and lived there from 2008-2010, so it's pretty important to me.  Only 2 years of my life, but it's become a part of me and a second home.  

Last spring, I found out about an opportunity to go back there to illustrate a field guide of medicinal plants.  The project was created by the MAHERY organization, and funded through National Geographic. NATIONAL GEOGRAPHIC! The book will be a guide of medicinal plants in the Maroantsetra area of Madagascar, written all in the Malagasy language (the language most spoken by people in Madagascar).  The book will be printed in 2014, and distributed for free to health workers in rural villages. Totally a Peace Corps-style project, but with a bigger budget and huge name behind it.  Pretty exciting stuff. I submitted some work samples and the hiring committee was tied between me and another applicant. So we split the work, and the pay, and we both went! I was there for about a month, knocking out 2-3, sometimes 4 illustrations per day, all digital!  Now, I knew Photoshop before, but doing 85 realistic plant illustrations using the program definitely refined my skills.  I also learned a lot from the other illustrator on the project.  Below is a picture of one sample. See more by clicking here.
The project happened to be located in a town close to the village I lived in my first year of Peace Corps. (That's when and where I met the guy who started this project). So during that month, I took a trip out to the village for a few days and stayed with my "family" (sister from another mister, and her family).
The Fam


Trip to the waterfall with the kiddos!

My family's store
It was SO great to be able to get back to the village for a visit.  It had been a long time, and it was good to see how things had changed - and not changed.  Someone remodeled my old house! (ok, remodeled is a strong word. They added a porch and put up wood walls instead of reeds). There's also been a few family moves, a few deaths, a few new houses built, a few new babies.  The murals I painted all over for people are all still there. Faded, but there. That was pretty cool to visually see something I left in the village. Great part of the trip. Before I knew it, the work part of my trip was over, and I flew back to the capital, Antananarivo, to meet my family! (my real, blood one). My parents and sister came out to meet me, and spent the next month traveling around with me! I can't even begin to explain in blog form how amazing that part was. Maybe I'll dedicate my next post to that part. But for now, i'll just say that it was definitely one of the highlights of my life so far, to be able to show them around.  My worlds collided: My life here, and my life there. Now they get it. They understand me in a way that they didn't before. And I got to share with them this beautiful country and the people there I care about, so that they could experience it all as well. It was amazing and I'm SO grateful that my parents and sister were able to make the trip. We'll never forget it and will always share those memories as a family. Anyway, more to come! If you're STILL interested in my trip (really?!?) then click here to see the chronological facebook photo album. Thanks for reading, dear readers....it's good to be back. :)

Monday, June 10, 2013

Goodbye for 2 months!!

Hey everyone,

Thanks for reading and your support on this blog. I'll be taking a 2 month break from blogging consistently, as I'll be working on an illustration project in Madagascar starting this Saturday. Wahoo! I'm really excited and grateful to be able to go back and for the great opportunity. (I did Peace Corps there from '08-'10).  I got offered a job to help illustrate a field guide of medicinal plants through a grant from National Geographic.  Super stoked. Anyway, thanks for following and I hope you will check back every once in awhile.  If I get a chance and find an internet connection that moves faster than dial-up circa 1998, then I will post updates while I'm over there.  In the meantime, thought I would share an old blog of mine that I kept while I was in the Peace Corps.  If you're interested click here to visit that blog.  Below is an excerpt from that blog, which is an excerpt from a book I was sort of kind of piecing together about my random experiences there. This part is about my best friend in my village, Bory. Enjoy! See you again here soon! :)

“Aia ny masaka e!” What’s cookin’? She called out from the path running
North to South between our houses. The sounds of tiny, squeaky voices
and tinkling seed pods as the dry weeds were parted got closer and
closer.
“Karibo e!” Come on in! I’d yell back from my place on my couch-bed,
hurriedly folding down the corner of the page in my book. I’d stick my
head out the door just in time to see the last of the weeds opening
like a gate and her family streaming out into the dirt clearing around
my house. Bory first, with her baby on her back, then her oldest, Lory
(12), Joby, her Nephew-turned-son (10) and finally Zaranay (3)
straggling behind still fighting the weeds. She would sit on the
ground outside my house as we exchange the usual, “What’s going on?
Nothing much, you? Nothing much.” I’d sit leaning against my door
frame, half in, half out of the house, facing her…the door’s curtain
blowing around me like a wild mane of hair.
Bory smiled at me, the upper corners of her grin growing wider and
wider, revealing her overbite and the dark place where she was missing
one tooth exactly in the center. I’d try to replace the tooth in my
mind imagine her with it there. I could never figure out which front
tooth she was missing; it looked like her teeth had just slid over to
one side so the missing notch was neither right nor left, but
perfectly, beautifully centered. As she jumped into a story concerning
our neighbor, I held her friendly gaze. Bory always looked me in the
eye when she talked to me. When I first met her, I remembered being
slightly taken aback by the bugginess of her large, round eyes. Now
familiar with her face, I let myself study her features, the high
cheekbones, the full lips, the sharp jawbones held up by an impossibly
thin neck. She had an un-obvious beauty that made me glad to have the
time to appreciate.
Still chattering on, the endless stream of words spewed out of her
tiny self and just as fast, my mind tried to compute them. Some words
stubbornly seemed to hang in the air, dancing around in front of my
face, waiting for recognition that would not come. If I focused my
attention on them, I would lose all that came after. It was like
having to squint at those magic eye posters to be able to see the
image. If you just focus on all the squiggly little lines, you miss
it. She was talking about how our neighbor had picked a fight with her
yesterday while I was out. A cow had wandered into Bory’s family’s
manioc fields and destroyed a lot of plants, so her and her
sister-in-law, Denise took it by the rope and led it back to its
owner, Maman’I Zafy. Apparently this led to a shouting match and ended
with ‘Antandroy’(dialect of ethnic group in Southern Madagascar)
insults hurled at Bory. A beggar. A dirt poor bitch. As far as I could
see, neither of them was more dirt poor than the other, and I’d never
seen Bory beg at Maman’I Zafy’s door, which I can see from my house.
It embarrasses me still to admit my naiveté in those weeks before I
came to Madagascar, when I’d lie in bed at night, eyes squeezed shut,
trying to picture my future home. I’d conjure up a golden plain
surrounded by rolling green hills, dotted with mango trees as the
backdrop. There would be a clearing with a few little huts built in a
circle. Women would cook outside their houses on fires and chat. Men
would walk around in the center, saying whatever was the equivalent of
“Hidey ho Neighbor!” in the local language. All wide smiles, laughing
children, bright clothes, bare feet. In this utopian image of the
village I held onto, African-print sarongs might as well be tie-dye,
their wearers whispering “Peace, man.” into the warm breeze.
This drama did not fit into my scene. I understand now more clearly
than ever the saying, the world is a village and each village, the
entire world.
Bory was still going strong, lifting her eyebrows and pausing from
time to time, for effect. I grunted and made noises to show I
understood and was listening, which I was, but I couldn’t honestly say
I was riveted. By this time, Lory and Joby had gotten restless and
started chasing each other around and around my house, screaming “No
you’re a dog penis!.” Zaranay had been restless from the start, but
now just
wanted attention. She picked a pinching fight with the 6 month old on
Bory’s lap. This of course, was completely one-sided. The baby
screamed and a clump of dirt he’d been munching on fell from his
mouth. Bory whipped out a breast to quiet him. Zaranay kept pinching.
Bory’s eyes never left mine.She holds Zaranay back from the baby, her
slender forearms stuck out separating them, all the while, spitting
the words quick like butterflies that I tried desperately to catch
before they fluttered away. By the time they go home, I am exhausted
though all I’d been doing was sitting.

Monday, June 3, 2013

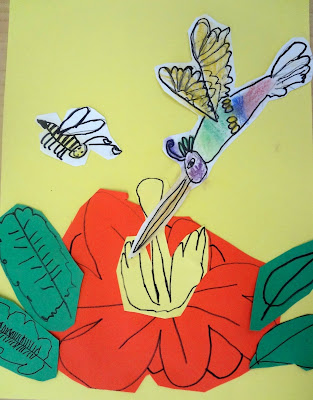
Art + Science Integrated: Pollination and Parts of a Flower!

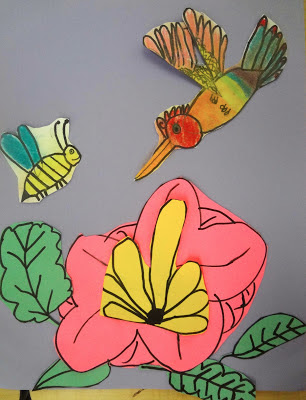
Today was my last lesson with my second graders.... can't believe Summer is here already! I was going to do this lesson with the kids because I just love love love how they turn out, but the 2nd grade team asked me to make an adjustment.  They asked if instead of a bird sitting on a branch, if we could make a pollinating hummingbird and bee next to a flower that included a stamen, anthers, petals, etc. Of course! Any time I can connect a lesson to science that the kids are already studying, I'm happy to do it. I could go deep into why kids need art and how art can help teach kids important concepts, but you probably already know that.  If not, then, well, trust me.  Or just do yourself a favor and read this book.  Actually, read that book anyway, whoever you are.  Anyway, onto the lesson! A lesson about the birds and the bees..... Not the one you're thinking ;)

MATERIALS:
• black sharpies
• colored drawing chalks
• half sheets of a flower petal color, and green for leaves. 
• quarter sheets of yellow for middles of flowers
• whole colored sheets for the background

Day 1:
• Lead a step-by-step drawing of a bee and hummingbird with pencils first.  Don't be scared! Start with the big shapes: first a lemon shape for the bird body. add a circle for the head. Make a big "V" on the bird's back. Add feathers to both sides of the "V" to make the wings. Add feet. Add head feathers and tail feathers. See? You can do this! And I'm gonna let you figure out the bee :)
• Trace over drawing in sharpie.
• used smeared chalks to color them in....sharpie lines still show through!

Day 2:
• Review parts of the flower with the kids.
• Draw the stamen and anthers (the middle parts of a flower) on the quarter yellow sheets.
• Make flower petals out of half sheets.
• Make leaves out of half sheets.
• Cut out ALL pieces, including bird and bee from last time, arrange on paper how you want it, glue!
pollination art lesson, hummingbird art lesson for kids, 2nd grade spring art lesson

pollination art lesson, hummingbird art lesson for kids, 2nd grade spring art lesson

pollination art lesson, hummingbird art lesson for kids, 2nd grade spring art lesson

pollination art lesson, hummingbird art lesson for kids, 2nd grade spring art lesson

pollination art lesson, hummingbird art lesson for kids, 2nd grade spring art lesson

Friday, May 31, 2013

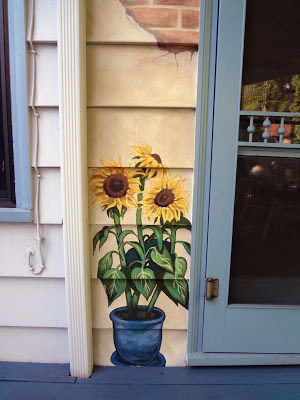
Trompe L'oeil Tuscan Porch Mural

Here's my latest mural project I've been working on.... last one till I leave for Madagascar!  The idea for this one came from a client's doormat that was in front of this back porch door! Never underestimate where inspiration may come from. The scene was somewhat similar, with an old wall with brick showing, and some other "Tuscan-y" things around. (Honestly, I'm not exactly sure what constitutes something looking "Tuscan", but apparently this is it). Anyway, I think this went nicely with the client's house and taste.  We realized that when it was done, the flowers were all in primary colors - the very colors she is most drawn to when buying clothes or anything. Perfect! I've done faux brick before, but this gave me a little more practice.  I'm happy with how it came out, now that I've done it a few times before.  I like how the whole thing makes me feel like I'm on vacation or something. Which I guess is the whole point of a mural like this - to transform a space, to lift your mood, to take you away to someplace nice.  Fun, fun!

trompe loeil tuscan mural, tuscany mural, eugene muralist

trompe loeil tuscan mural, tuscany mural, eugene muralist

trompe loeil tuscan mural, tuscany mural, eugene muralist

trompe loeil tuscan mural, tuscany mural, eugene muralist

trompe loeil tuscan mural, tuscany mural, eugene muralist

trompe loeil tuscan mural, tuscany mural, eugene muralist

Wednesday, May 29, 2013

Romero Britto Art Lesson for Kids

Uh, so I just ran across these pictures in my iphoto and thought, "aw, that was a fun lesson..." and then realized that I never posted about them here for my fellow art teacher types! So here it is,
  The Art of Romero Britto for 3rd Grade (and up)

You will need: black sharpies (or similar), colored markers, and white paper. And at least an hour, or a couple sessions broken up. 

1.) We talked about the life of Romero Britto, and his rags to riches sort of story of how he came to fame in the gallery scene. (Wikipedia his name to get more info.)

2.) As always, show a slideshow of his work, and ask kids what they notice. How do we know that these are all done by the same artist?? (talk about: pattern and what makes something a pattern, his bright colors, etc.)

3.) Have the kids draw a pet, or a favorite animal. Some kids needed some extra help on this, so we walked through drawing a few of the more popular animals step-by-step. 

4.) Trace the animal in black sharpie, then use a ruler to make at least 5 lines through their pictures. 

5.) Fill each area with a different pattern, using colored markers.  Show a few examples of patterns to get them started, and thinking outside the usual polka dots and stripes. 

So cute!

Romero Britto kids art lesson, romero britto lesson for 3rd grade

Romero Britto kids art lesson, romero britto lesson for 3rd grade

Romero Britto kids art lesson, romero britto lesson for 3rd grade

Tuesday, May 28, 2013

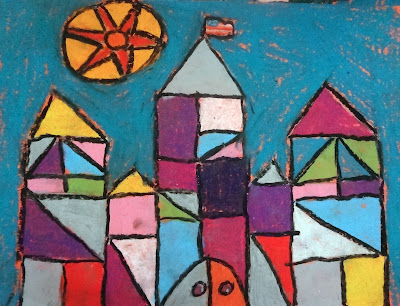
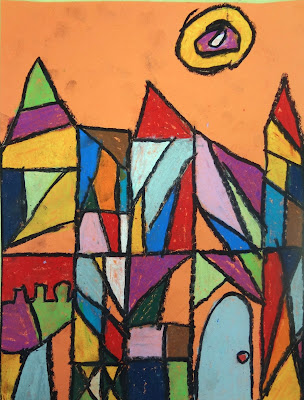
Paul Klee Cubism Castles!

Paul Klee with 3rd Grade

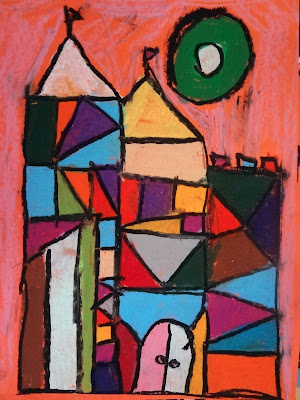
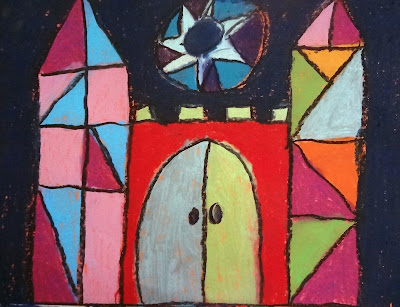
Today was my last art lesson with my 3rd graders of the school year! :( So crazy! I'm glad it was a fun one!! Read on to see how we made these beautiful Paul Klee inspired castles!

I showed them a slideshow of Klee's more Cubist pieces, and as always, asked the kids to use their powers of observation to practice analyzing art.   It was the last art lesson I taught them this year, so by now they're getting good at this. They surprise me sometimes with the things they notice - "It's like, abstract, but you can still see buildings some places", "He likes to put bright colors next to more boring ones", "He has a theme of a color and then puts a few other random colors with them, like mostly purple and blue, but then some random yellows". Aw, brilliant! Kids can analyze art, you just have to give them some vocabulary and let them do it.

ALL YOU NEED: Orange paper and oil pastels!

• To make our Klee Castles, we talked about Geometric vs. Organic shapes. 
• Then, we talked about what kinds of things we might see on a castle. 
• Then, on orange paper, kids drew their castles with pencil, using rulers to make straight lines.
• Then, they broke their castles up into smaller geometric shapes. 
• Then, they filled in each shape with a different color of oil pastel.
• Finally, all their shapes were outlined with either black or dark blue oil pastel. 

AREN"T THESE SO AMAZING?! I loved how they turned out :) Have fun!!!

paul klee kid art project, paul klee cubism castles

paul klee kid art project, paul klee cubism castles

paul klee kid art project, paul klee cubism castles

paul klee kid art project, paul klee cubism castles

paul klee kid art project, paul klee cubism castles

paul klee kid art project, paul klee cubism castles

paul klee kid art project, paul klee cubism castles

paul klee kid art project, paul klee cubism castles

paul klee kid art project, paul klee cubism castles


On the Job Pup Friend!

I'm painting a new mural for someone and this is the best part: she has a greyhound pup! I looove greyhounds, and this one is the sweetest (hence her name, Sugar). She kept coming out the back doggie door and saying hello, sniffing around as I worked, then going back inside, then coming back outside, etc. Unexpected job perks for the win!greyhound, tuscan mural,

I'll post the finished mural soon. :) This is the last mural I'll be doing before I leave for Madagascar for the Summer. Have a great day everyone!


Saturday, May 25, 2013

Spring Garden Collaborative Paper Mural!

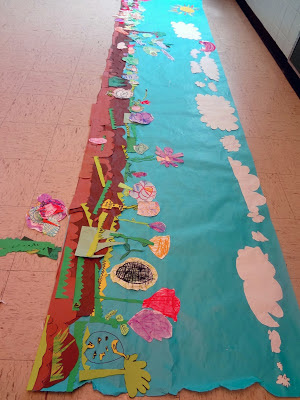
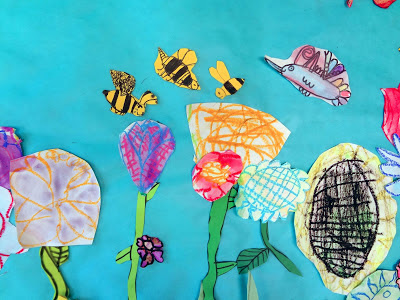
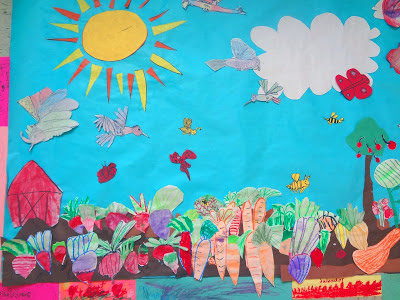
I'm so excited to show you what I've been working on with the students at Oakridge Elementary!! I've been meeting with a group of about 20 K-3 students, twice a week after school. It's considered their "Art Club".  It's really nice... they have a grant to help them bring in Lane Arts Council Teaching Artists (me) all the time, so they're constantly rotating and learning different techniques and materials. Pretty neat for such a rural school that might not get that kind of stuff otherwise. Anyway, onto the project! 

Collaborative paper murals do a lot of good for kids.  It's great to get kids working on their own pieces, and then "give them up" to be a part of a much bigger work of art. So they get to be creative and work independently, and then they get to work as a team to put it all together as a whole. Here's what we did:
____________________________________________________
Day 1: We made vegetables and flowers using oil pastel and watercolors over them (same thing as a crayon resist technique).

Day 2: We split into teams and some tables made dirt, some made clouds, some made flower stems and grass, some made a sun. We took turns gluing things onto the blue butcher paper (I didn't do any of that, they got to make all the choices together, by communicating with each other - key!)

Day 3: We did step-by-step drawing together to make a bumblebee, hummingbird, and butterfly. Each student made one of each, then we glued these on, too. 

This project is PERFECT for springtime lessons about pollination!!! Half of our mural was a veggie garden, half a flower garden. We talked about the importance of the pollinators to both sides. This is really really worth the time and effort. Kids love it, it teaches science concepts, teamwork and communication, and also independent work and creativity. Have fun!!

pollination art project, cut paper garden mural, spring science art project
before we added pollinators....
pollination art project, cut paper garden mural, spring science art project
gluing pieces on...

pollination art project, cut paper garden mural, spring science art project

pollination art project, cut paper garden mural, spring science art project
Each student made one of each kind of pollinator!

 End Results:
pollination art project, cut paper garden mural, spring science art project

pollination art project, cut paper garden mural, spring science art project

pollination art project, cut paper garden mural, spring science art project

pollination art project, cut paper garden mural, spring science art project

pollination art project, cut paper garden mural, spring science art project

pollination art project, cut paper garden mural, spring science art project

pollination art project, cut paper garden mural, spring science art project