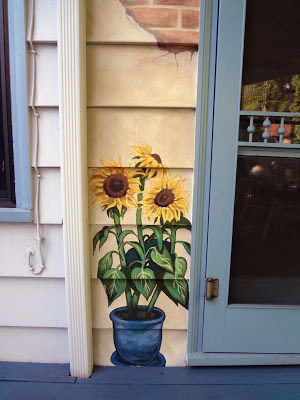
Here's my latest mural project I've been working on.... last one till I leave for Madagascar! The idea for this one came from a client's doormat that was in front of this back porch door! Never underestimate where inspiration may come from. The scene was somewhat similar, with an old wall with brick showing, and some other "Tuscan-y" things around. (Honestly, I'm not exactly sure what constitutes something looking "Tuscan", but apparently this is it). Anyway, I think this went nicely with the client's house and taste. We realized that when it was done, the flowers were all in primary colors - the very colors she is most drawn to when buying clothes or anything. Perfect! I've done faux brick before, but this gave me a little more practice. I'm happy with how it came out, now that I've done it a few times before. I like how the whole thing makes me feel like I'm on vacation or something. Which I guess is the whole point of a mural like this - to transform a space, to lift your mood, to take you away to someplace nice. Fun, fun!
Friday, May 31, 2013
Wednesday, May 29, 2013
Romero Britto Art Lesson for Kids
Uh, so I just ran across these pictures in my iphoto and thought, "aw, that was a fun lesson..." and then realized that I never posted about them here for my fellow art teacher types! So here it is,
The Art of Romero Britto for 3rd Grade (and up)
You will need: black sharpies (or similar), colored markers, and white paper. And at least an hour, or a couple sessions broken up.
1.) We talked about the life of Romero Britto, and his rags to riches sort of story of how he came to fame in the gallery scene. (Wikipedia his name to get more info.)
2.) As always, show a slideshow of his work, and ask kids what they notice. How do we know that these are all done by the same artist?? (talk about: pattern and what makes something a pattern, his bright colors, etc.)
3.) Have the kids draw a pet, or a favorite animal. Some kids needed some extra help on this, so we walked through drawing a few of the more popular animals step-by-step.
4.) Trace the animal in black sharpie, then use a ruler to make at least 5 lines through their pictures.
5.) Fill each area with a different pattern, using colored markers. Show a few examples of patterns to get them started, and thinking outside the usual polka dots and stripes.
So cute!

Tuesday, May 28, 2013
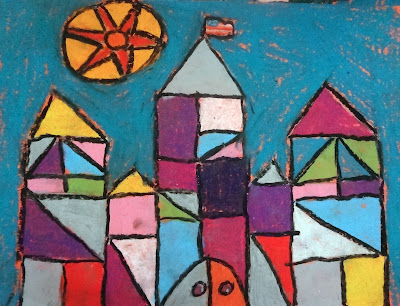
Paul Klee Cubism Castles!
Paul Klee with 3rd Grade
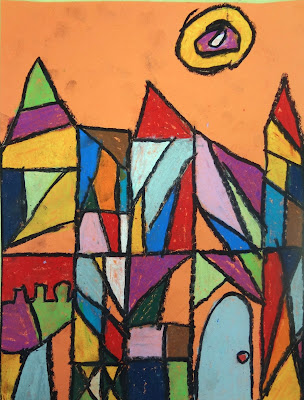
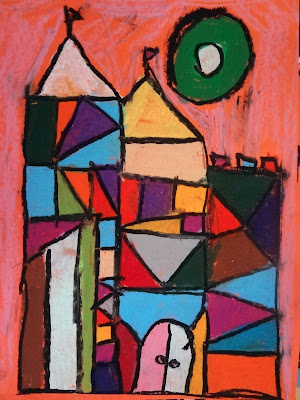
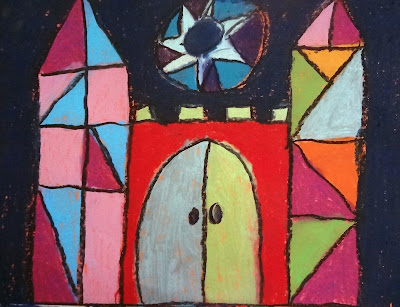
Today was my last art lesson with my 3rd graders of the school year! :( So crazy! I'm glad it was a fun one!! Read on to see how we made these beautiful Paul Klee inspired castles!
I showed them a slideshow of Klee's more Cubist pieces, and as always, asked the kids to use their powers of observation to practice analyzing art. It was the last art lesson I taught them this year, so by now they're getting good at this. They surprise me sometimes with the things they notice - "It's like, abstract, but you can still see buildings some places", "He likes to put bright colors next to more boring ones", "He has a theme of a color and then puts a few other random colors with them, like mostly purple and blue, but then some random yellows". Aw, brilliant! Kids can analyze art, you just have to give them some vocabulary and let them do it.
ALL YOU NEED: Orange paper and oil pastels!
• To make our Klee Castles, we talked about Geometric vs. Organic shapes.
• Then, we talked about what kinds of things we might see on a castle.
• Then, on orange paper, kids drew their castles with pencil, using rulers to make straight lines.
• Then, they broke their castles up into smaller geometric shapes.
• Then, they filled in each shape with a different color of oil pastel.
• Finally, all their shapes were outlined with either black or dark blue oil pastel.

On the Job Pup Friend!
I'm painting a new mural for someone and this is the best part: she has a greyhound pup! I looove greyhounds, and this one is the sweetest (hence her name, Sugar). She kept coming out the back doggie door and saying hello, sniffing around as I worked, then going back inside, then coming back outside, etc. Unexpected job perks for the win!
I'll post the finished mural soon. :) This is the last mural I'll be doing before I leave for Madagascar for the Summer. Have a great day everyone!

I'll post the finished mural soon. :) This is the last mural I'll be doing before I leave for Madagascar for the Summer. Have a great day everyone!
Saturday, May 25, 2013
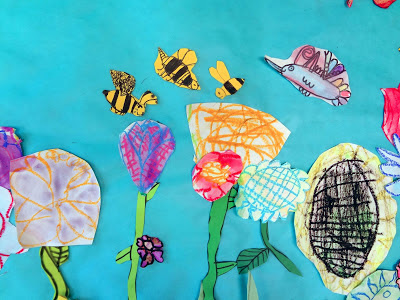
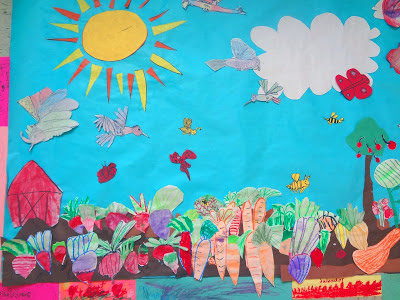
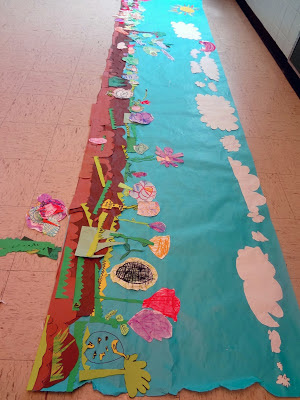
Spring Garden Collaborative Paper Mural!
I'm so excited to show you what I've been working on with the students at Oakridge Elementary!! I've been meeting with a group of about 20 K-3 students, twice a week after school. It's considered their "Art Club". It's really nice... they have a grant to help them bring in Lane Arts Council Teaching Artists (me) all the time, so they're constantly rotating and learning different techniques and materials. Pretty neat for such a rural school that might not get that kind of stuff otherwise. Anyway, onto the project!
Collaborative paper murals do a lot of good for kids. It's great to get kids working on their own pieces, and then "give them up" to be a part of a much bigger work of art. So they get to be creative and work independently, and then they get to work as a team to put it all together as a whole. Here's what we did:
____________________________________________________
Day 1: We made vegetables and flowers using oil pastel and watercolors over them (same thing as a crayon resist technique).
Day 2: We split into teams and some tables made dirt, some made clouds, some made flower stems and grass, some made a sun. We took turns gluing things onto the blue butcher paper (I didn't do any of that, they got to make all the choices together, by communicating with each other - key!)
Day 3: We did step-by-step drawing together to make a bumblebee, hummingbird, and butterfly. Each student made one of each, then we glued these on, too.
This project is PERFECT for springtime lessons about pollination!!! Half of our mural was a veggie garden, half a flower garden. We talked about the importance of the pollinators to both sides. This is really really worth the time and effort. Kids love it, it teaches science concepts, teamwork and communication, and also independent work and creativity. Have fun!!
 |
| before we added pollinators.... |
 |
| gluing pieces on... |
 |
| Each student made one of each kind of pollinator! |
End Results:

Thursday, May 23, 2013
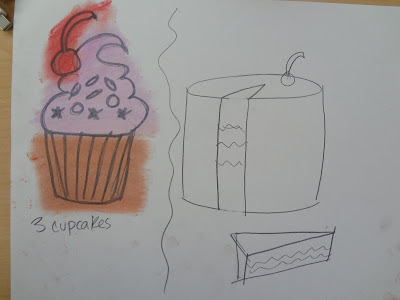
Wayne Thiebaud Lesson for 3rd Grade
Introducing Wayne Thiebaud to 3rd Graders:
My 3rd grade classes loved this delicious lesson! Read on to see exactly what we did:
Materials:
• white construction paper
• Colored construction paper for backgrounds (we used yellow, blue and lavender)
• colored drawing chalks
• black marker (we used sharpie)
1.) Introduce the art of Wayne Thiebaud to the kids. Here's a link to get you started. Ask them what kinds of things they notice from the slideshow of his art that you show them. (Pastel colors, repetition, bright shadow colors, they're all desserts!!). Make sure you mention that Thiebaud worked in an ice cream parlour in his early artist days, which inspired his paintings!
2.) Show how to draw a cupcake. Start with a cylinder with tapered sides (don't forget the rounded bottom, not straight across!!) Add frosting on the top, sprinkles and a cherry maybe. Tell them that making 3 cupcakes is one of their options. Their other option is a big cake with a slice taken out. Start again with a cylinder, then a triangle and lines down to take the slice out.
3.) Kids draw with pencils, then trace over in black marker. Show how to draw with chalks over their drawings and then blend in with their fingers. The black lines remain. No need to be super careful and stay inside the lines, they will cut these out anyways.
4.) Give them a colored sheet for their backgrounds. Remind them of Thiebaud's signature bright shadows, and suggest that they make a line for a table, and bright shadows for however many desserts they drew.
5.) Cut out desserts and paste onto the table over the shadows. YUM!!!

Wednesday, May 22, 2013
A Sale is a Sale.....Or Is It??
I have an Etsy site where I sell paintings and prints sometimes, and I most recently sold the one below:
Here's what this painting is about, from the description on the Etsy listing:
This painting is a part of a series that depicts female characters from books I've read. This particular painting is inspired by the "Hanna" character in the book, "The Reader" by Bernhard Schlink.
The book was first published in Germany in 1995 and explores a post-war, post-Nazi Germany. The book centers around Hanna Schmitz, a former SS guard at Auschwitz. "The Reader" is a story about her struggle to come to terms with her past and about how she deals with things in the present moment. Hanna learns to read during her journey. The book was very well received and won many awards. Hanna is such a complicated character and I just had to paint her when I was done reading her story!
The book was first published in Germany in 1995 and explores a post-war, post-Nazi Germany. The book centers around Hanna Schmitz, a former SS guard at Auschwitz. "The Reader" is a story about her struggle to come to terms with her past and about how she deals with things in the present moment. Hanna learns to read during her journey. The book was very well received and won many awards. Hanna is such a complicated character and I just had to paint her when I was done reading her story!
So, the newspaper behind her symbolizes her new life, learning to read. The black and white stripes symbolize her being thrown in jail for war crimes after the trials following the Holocaust. The swastika made of skull paper symbolizes her horrific past as an SS guard. To me, a Jewish woman, Hanna's story is a tremendously sad one, but worth exploring as an illustration and part of my Literary Heroines story. (To see this whole series, click here)
So, here's the ironic punchline: with a little cyber stalking (initiated because of a strange sounding email address), I find out I sold the painting to a white supremacist. Or, at least to someone who likes Nazis so much they make the swastika with the "SS" bolts, their profile picture. This person's money was already in my bank account, and I had to follow through with the sale in order to keep my reputation on Etsy. This turns my stomach. This is not the point of this painting. But what am I supposed to do? It's a very exaggerated example of how differently people can interpret artwork, and find their own meaning and connections to the same image. A good lesson, though one I would have preferred learning another way. I think I'll have to make a donation to Yad Vashem, the holocaust museum in Jerusalem, that I visited awhile back, to even out cozmic karma. Ugghhhhh....YUCK!
Subscribe to:
Posts (Atom)


