Thursday, January 31, 2013

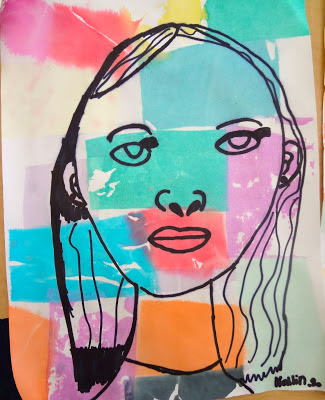
Paul Klee Inspired Self Portrait Lesson

Self portrait face proportions lesson for kids
Art Teachers loooove to do self portraits with kids.  This was a cool twist on the self portrait AND it involves art appreciation AND is much easier to clean up and set up than paint.  Perfect! Read on if you wanna do it too. 

You will need:
- white paper (duh)
- sharpies
- newspapers or something to protect desks from said sharpies
- bleeding art tissue paper, cut into small squares (craft stores)
- 1 or 2 spray bottle(s)

Lesson:

1.) Introduce Paul Klee...show slideshow of his work (especially ones with the colored squares).  Talk about how he was very interested in color theory - how colors relate to other colors around them. Ask kids to describe some of his paintings or share what they observed.

2.) Show how to draw a face in correct proportions. Have kids follow along with you as you draw on the board. They will draw all their guide lines in pencil. I learned about proportions of the face back in middle school and it's stuck with me. Here's a great, simple guide

3.) Once they have their guidelines, students trace over ONLY their features and add details in sharpie. Make sure they're not tracing their guide lines. They don't really need to erase their pencil lines, because  once the paper gets wet, they disappear. Emphasize that all the details unique to them will be what makes their portrait look like them: freckles, how they part their hair, face shape, etc. 

4.) Pass out tissue squares and have them lay them all out how they want them, thinking about Paul Klee and his experiments with color relationships. Go around and spray each piece with water once kids have them all laid out. After a couple minutes, take off tissue paper and let dry. So cute, right??

These were done by 3rd graders:

Self portrait face proportions lesson for kidsSelf portrait face proportions lesson for kids

Self portrait face proportions lesson for kids

Self portrait face proportions lesson for kidsSelf portrait face proportions lesson for kids


Wednesday, January 30, 2013

Georgia O'Keefe Art Lesson Plan

Georgia O'Keefe Art Lesson Plan for Kids
 5th Grade Georgia O'Keefe Art
This is a go-to lesson for me and here's why:  This lesson works for any grade... really!  I've done this with Kinders up to 8th graders, and have found they all can be successful at it.  They turn out really nice and are great for brightening hallways, the kids learn about an artist and get an introduction to observational drawing. Read on if you want to see how I do it!

You will need:

- Assorted fake flowers - buy these once and you can use them for years!  Michaels always has sales on their flowers, too. 
- Oil Pastels or crayons
- Watercolor paints
- White paper.... big or regular sized... how much time do you have??

Lesson Plan:

1.) Introduce Georgia O'Keefe. Wikipedia some stuff about her life, and/or find a youtube video about her. There's tons of stuff out there. 

2.) Show pictures of Georgia O'Keefe's flower paintings. Ask the kids what they observe about them, and what they think she's doing differently from other artists. If you can get it out of them, you're looking for them to say she's painting them really big! Explain that part of what made her art famous, was that she painted flowers in EXTREME CLOSE-UP instead of the typical view of flowers in a vase on a table or something. 

3.) Talk about the difference between a CLOSED COMPOSITION and an OPEN COMPOSITION. (Closed means nothing's going off the page and everything's contained in the picture boundaries, Open composition is the opposite). Explain that they will be doing an Open Composition today.  Show them your example, and tell them there's one rule when they're drawing their flowers: Their flower must be SO BIG that it touches at least 3 SIDES OF THEIR PAPERS. This is a hard one for some kids to get.... a lot of kids tend to want to draw everything tiny. This is a good stretch for some, and gets them out of their comfort zones. 

4.) Hand out art supplies and work!  Give each kid one of the fake flowers to draw.  If you're working with older kids, remind them to look for color variations and tiny details and shapes they might see in their flowers - work on those observation skills!! Draw first in oil pastel, cover with watercolors. You might emphasize the use of a contrasting color in the background to really "pop" their flowers.

5.) Let dry, then hang up somewhere boring that needs some LIFE and COLOR!

Georgia O'Keefe Art Lesson Plan for Kids
3rd Grade Georgia O'Keefe Art
Georgia O'Keefe Art Lesson Plan for Kids
3rd Grade Georgia O'Keefe Art
Georgia O'Keefe Art Lesson Plan for Kids
5th Grade Georgia O'Keefe Art
Georgia O'Keefe Art Lesson Plan for Kids
3rd Grade Georgia O'Keefe Art
Georgia O'Keefe Art Lesson Plan for Kids
5th Grade Georgia O'Keefe Art
Georgia O'Keefe Art Lesson Plan for Kids
5th Grade Georgia O'Keefe Art


Saturday, January 19, 2013

Pop Art Lesson with 3rd Grade

I love using Pinterest for many reasons.  It satisfies a need for stimulation without having to really think about anything.  Almost calming in it's chaos.  Pinterest is where I got my AMAZING recipe for St. Patty's Guiness and Bailey's infused cupcakes (almost time to bust that one out again!).  I love it.  If you're a teacher or an art teacher and on Pinterest, you know the abundance of lesson plan ideas on there.  You've probably come across those Kandinsky circle projects about 1000 times.  Usually, I like to tweak the lesson plan ideas I get from there, combining with other lessons, adding or subtracting certain materials, etc.  But this lesson is straight-up Pinterest, with a bit of added art school/art history flair from me. The original link can be found here.  

Pop Art Mugs
Supplies:

• Big white construction paper (12 x 18")
• Oil Pastels 
• Watercolors

Lesson:

1.) Discuss "Pop Art" (short for "Popular Art") movement.  It was the late 1950's, early 60's response to the early 50's Abstract movement.  Pop artists did not care for abstract art; they wanted to produce art that actually looked like something.  Pop Artists starting producing art that contained consumer products, comics, mass media and advertising - things that everyone would recognize.

2.) Show some pictures of Pop Art: Andy Warhol, Wayne Theibaud, Roy Lichtenstein, etc. Ask kids for their observations.  Note that Warhol often repeated images over and over, though slightly tweaked each time. 

3.) DEMO and work time!: Show how to draw an ellipse correctly - no pointed sides, only rounded! Show how to draw a cup with the sides angling inwards and the bottom also ROUNDED and not flat. Explain how the oil pastels will resist the watercolor, so they should not be filling in areas with their oil pastels, rather drawing patterns.  They should leave their cups blank with no designs.  Lead students through folding their paper to get 6 even sections, then outlining fold lines with black pastel. Draw a cup in each section, with a table underneath it. Make patterns in each area, except cups. Fill in areas with watercolor. Voila! Pop Art cups. These turned out really beautiful and we only had a 45 minute class to complete the entire lesson and project!