Showing posts with label 2nd grade art lessons. Show all posts

Monday, June 3, 2013

Art + Science Integrated: Pollination and Parts of a Flower!

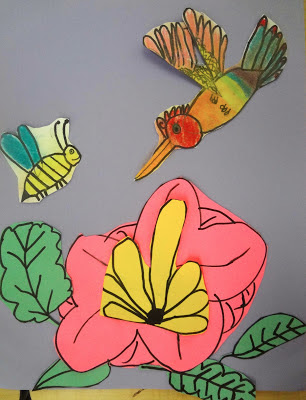
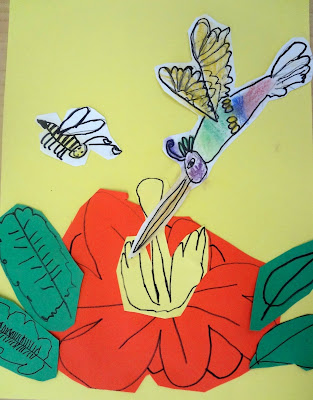
Today was my last lesson with my second graders.... can't believe Summer is here already! I was going to do this lesson with the kids because I just love love love how they turn out, but the 2nd grade team asked me to make an adjustment.  They asked if instead of a bird sitting on a branch, if we could make a pollinating hummingbird and bee next to a flower that included a stamen, anthers, petals, etc. Of course! Any time I can connect a lesson to science that the kids are already studying, I'm happy to do it. I could go deep into why kids need art and how art can help teach kids important concepts, but you probably already know that.  If not, then, well, trust me.  Or just do yourself a favor and read this book.  Actually, read that book anyway, whoever you are.  Anyway, onto the lesson! A lesson about the birds and the bees..... Not the one you're thinking ;)

MATERIALS:
• black sharpies
• colored drawing chalks
• half sheets of a flower petal color, and green for leaves. 
• quarter sheets of yellow for middles of flowers
• whole colored sheets for the background

Day 1:
• Lead a step-by-step drawing of a bee and hummingbird with pencils first.  Don't be scared! Start with the big shapes: first a lemon shape for the bird body. add a circle for the head. Make a big "V" on the bird's back. Add feathers to both sides of the "V" to make the wings. Add feet. Add head feathers and tail feathers. See? You can do this! And I'm gonna let you figure out the bee :)
• Trace over drawing in sharpie.
• used smeared chalks to color them in....sharpie lines still show through!

Day 2:
• Review parts of the flower with the kids.
• Draw the stamen and anthers (the middle parts of a flower) on the quarter yellow sheets.
• Make flower petals out of half sheets.
• Make leaves out of half sheets.
• Cut out ALL pieces, including bird and bee from last time, arrange on paper how you want it, glue!
pollination art lesson, hummingbird art lesson for kids, 2nd grade spring art lesson

pollination art lesson, hummingbird art lesson for kids, 2nd grade spring art lesson

pollination art lesson, hummingbird art lesson for kids, 2nd grade spring art lesson

pollination art lesson, hummingbird art lesson for kids, 2nd grade spring art lesson

pollination art lesson, hummingbird art lesson for kids, 2nd grade spring art lesson

Friday, February 8, 2013

Self Portraits With Borders!

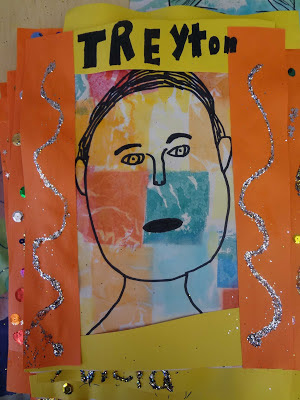
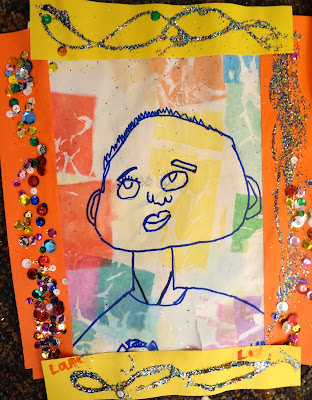
I just LOVED how these self portraits came out.  One of my favorite parts of doing an extended residency at a school, rather than a quick one day lesson or workshop, is the fact that there is so much more time to complete a project. These kids learned the proportions of the face, traced their portraits in sharpie, and colored them with bleeding art tissue paper all in one 45 minute session. (Check out the post on how to do that part here).  We let these dry, then the next day, were able to add and decorate these borders.  Sometimes it's worth it to just put out a bunch of fun materials that kids don't get to use very often, and see what happens. For our border sessions, I put out sequins, glitter (which I - along with every other teacher on the planet - have a love/hate relationship with), stamps, and markers. I told them they needed their names on them, but the rest was up to them to decorate. Oh man, those 2 days we finished this project, I could rest assured that each child was carrying glitter wherever they went just like the viciously infectious colds and flus going around. That stuff was EVERYWHERE. A kind teacher brought in a broom for me, and I (mostly) was able to take care of it. It was the chunky kind, so it sweeps. Just TRY to get the fine stuff off of something. I dare you. We had a great time with these. Below are a sampling of kids grades 2-5. 

Enjoy, and go bravely forward with glittering!

Kids Self Portrait Lesson

Kids Self Portrait Lesson

Kids Self Portrait Lesson

Kids Self Portrait Lesson

Kids Self Portrait Lesson

Kids Self Portrait Lesson

Kids Self Portrait Lesson

Kids Self Portrait Lesson

Thursday, February 7, 2013

Jim Dine Valentine's Day Art Lesson


There are a lot of Jim Dine inspired Valentine's Day art projects out there.... here is my version. Enjoy! This is a great lesson especially for littler ones (K-3), but 4/5ers have fun with it as well. 

Supplies:

• Oil Pastels
• black markers (we used sharpies)
• small pre-cut squares in whatever color (I think these are 4" x 4")
• red construction paper

Lesson:

• Talk about Jim Dine and the Pop Art movement (Pop Artists wanted to sort of rebel against abstract art, and start painting things that everyone could recognize - celebrity portraits, everyday objects, etc.)  Show some of his artwork, especially focusing the slideshow on his heart pieces!
• Have kids draw outlines and shading on hearts with markers. Show kids how to "cross-hatch" for the shading on the top of the heart. Emphasize the thick outline of the hearts.
• Color in little patches of colors in many colors of oil pastel all over inside and outside their hearts until they cover their whole squares.
• Once both squares are done, glue them both to the front of a card folded "hamburger style". Voila! They can write in them to someone in their families - (good opportunity for a writing assignment here!)

Happy Valentine's Day!
Jim Dine Valentine's Day Art Lesson

Jim Dine Valentine's Day Art Lesson

Jim Dine Valentine's Day Art Lesson

Jim Dine Valentine's Day Art LessonJim Dine Valentine's Day Art Lesson


Tuesday, February 5, 2013

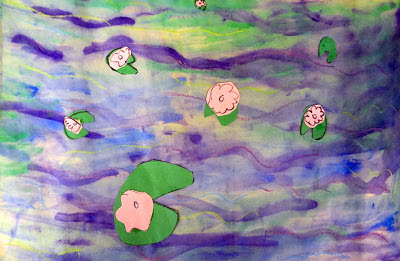
Monet Waterlilles Art Lesson

I just did this lesson last week for grades 1-5 and guess what? They ALL turned out cuter than cute!  I think this is a lesson that every student can be successful at.  That particular point is something I've been  trying to work towards in my lesson planning.  A good art lesson it seems, is simple enough that any student in the class can complete it and have it look decent.  It should also allow enough creative choices so that the more artistic students in the class can take the lesson and run with it.  Hard to balance, but I'm learning, slowly but surely.  This was a fun one.  And Monet is so classic you can't go wrong.  Here's how I did it:

Day 1: 
• Show pics of Monet's waterlillies - talk about THIS: Two inventions around the time of Monet really changed the art world and influenced what he was doing:
-#1: THE CAMERA - Now artists could branch out beyond super realism because a camera could do that for people now.  Hence, Impressionism. 
-#2: PAINT IN TUBES - Now, artists could bring their paint outside the studio, and paint out in front of their landscape subjects.
• Draw with COOL COLOR oil pastels (good opportunity to review the color wheel)...small strokes like monet, horizontal "water-y squiggles".
• Paint over it with COOL COLOR watercolors. 

Day 2:
• Explain basic PERSPECTIVE: Things get smaller as they get further away from you.  Their waterlillies should try to follow that rule. Have them make big, medium and small lilliepads and waterlillies out of construction paper, and arrange them with this perspective rule in mind, to give the pictures more depth.

Have fun!

Monet Art Lesson for Kids

Monet Art Lesson for Kids

Monet Art Lesson for Kids

Monet Art Lesson for Kids

Monet Art Lesson for Kids

Wednesday, January 30, 2013

Georgia O'Keefe Art Lesson Plan

Georgia O'Keefe Art Lesson Plan for Kids
 5th Grade Georgia O'Keefe Art
This is a go-to lesson for me and here's why:  This lesson works for any grade... really!  I've done this with Kinders up to 8th graders, and have found they all can be successful at it.  They turn out really nice and are great for brightening hallways, the kids learn about an artist and get an introduction to observational drawing. Read on if you want to see how I do it!

You will need:

- Assorted fake flowers - buy these once and you can use them for years!  Michaels always has sales on their flowers, too. 
- Oil Pastels or crayons
- Watercolor paints
- White paper.... big or regular sized... how much time do you have??

Lesson Plan:

1.) Introduce Georgia O'Keefe. Wikipedia some stuff about her life, and/or find a youtube video about her. There's tons of stuff out there. 

2.) Show pictures of Georgia O'Keefe's flower paintings. Ask the kids what they observe about them, and what they think she's doing differently from other artists. If you can get it out of them, you're looking for them to say she's painting them really big! Explain that part of what made her art famous, was that she painted flowers in EXTREME CLOSE-UP instead of the typical view of flowers in a vase on a table or something. 

3.) Talk about the difference between a CLOSED COMPOSITION and an OPEN COMPOSITION. (Closed means nothing's going off the page and everything's contained in the picture boundaries, Open composition is the opposite). Explain that they will be doing an Open Composition today.  Show them your example, and tell them there's one rule when they're drawing their flowers: Their flower must be SO BIG that it touches at least 3 SIDES OF THEIR PAPERS. This is a hard one for some kids to get.... a lot of kids tend to want to draw everything tiny. This is a good stretch for some, and gets them out of their comfort zones. 

4.) Hand out art supplies and work!  Give each kid one of the fake flowers to draw.  If you're working with older kids, remind them to look for color variations and tiny details and shapes they might see in their flowers - work on those observation skills!! Draw first in oil pastel, cover with watercolors. You might emphasize the use of a contrasting color in the background to really "pop" their flowers.

5.) Let dry, then hang up somewhere boring that needs some LIFE and COLOR!

Georgia O'Keefe Art Lesson Plan for Kids
3rd Grade Georgia O'Keefe Art
Georgia O'Keefe Art Lesson Plan for Kids
3rd Grade Georgia O'Keefe Art
Georgia O'Keefe Art Lesson Plan for Kids
5th Grade Georgia O'Keefe Art
Georgia O'Keefe Art Lesson Plan for Kids
3rd Grade Georgia O'Keefe Art
Georgia O'Keefe Art Lesson Plan for Kids
5th Grade Georgia O'Keefe Art
Georgia O'Keefe Art Lesson Plan for Kids
5th Grade Georgia O'Keefe Art


Sunday, December 2, 2012

Van Gogh's "Starry Night"....2nd grader style!

November lessons continued: Van Gogh's "Starry Night" with 2nd grade 

This is probably my favorite lesson from November, and one of my top favs for the lower grades. The kids loved it and I think they turned out adorable and beautiful! I combined a couple different things I saw on Pinterest for this lesson plan. If you want to know exactly how to do my version of this lesson, read on!

Materials:
• 11 x 17 white construction paper
• blue, purple and yellow tempera paints and brushes
• black and yellow construction paper

1.) Talk to the kids about Van Gogh. Make a point that he only ever sold like ONE painting in his lifetime....to his brother! Now his paintings are worth millions. Kids get a kick out of that. You can emphasize that they should try not to be discouraged, and that if they're doing what they love, it will be worth it all. I dunno, I thought this was a good life lesson somehow, even if it's a sort of depressing fact about Van Gogh's struggle of a life. 

2.) Show some of Van Gogh's paintings and end with "Starry Night". Have kids describe it. Make sure you emphasize his short, numerous brush strokes or "dots" of color - he didn't blend, just placed colors next to each other. This will be the important part to talk about, since it's what the kids are about to do.

3.) Give kids blue, purple and yellow tempera paints in those little white plastic palettes. 1 per table group works fine. 

4.) Do this as a "follow along" painting. Under the document camera, paint along with the kids. First tell everyone to do yellow stars and moons in their sky. Follow that with painting blue swirls around them (but not blending into the stars, that would make a green mess, PLUS, explain again that Van Gogh only placed colors next to each other without blending). Then, fill in all the extra spaces with the purple, using short, small brush strokes like Van Gogh. Leading the kids through this painting process will make their skies turn out better, and they will all look completely different anyways. :)

5.) NEXT DAY: After their skies have dried, hand out sheets of black and half sheets (or smaller) of yellow paper. Show "Starry Night" again and show how there's some trees and some city in there. Have kids make half trees and half buildings with their black. Then they can cut out yellow windows to add to their buildings or houses. Glue it all to the backgrounds. Done!! 

LESSON AFTERTHOUGHT: After each lesson, I learn a lot and sometimes have new ideas for how I would do the same lesson the next time. I think this lesson could work REALLY well if done with oil or chalk pastels on dark blue paper. Wouldn't that be gorgeous? Plus, you wouldn't have to wait till the next day to finish, since there's no drying time! Must try that next time!!

Talking Walls art with kids: Starry Night for 2nd grade

Talking Walls art with kids: Starry Night for 2nd grade

Talking Walls art with kids: Starry Night for 2nd grade

Talking Walls art with kids: Starry Night for 2nd grade

Talking Walls art with kids: Starry Night for 2nd grade

Talking Walls art with kids: Starry Night for 2nd grade

Talking Walls art with kids: Starry Night for 2nd grade

Talking Walls art with kids: Starry Night for 2nd grade


Friday, November 30, 2012

Matisse Still Lives

It's the end of November already and that means posting about this month's art lessons!  Here is the lesson I did with 3rd grade. (Look for more posts to come about my 2nd and 1st grade projects!) Read on if you'd like step-by-step instructions for this lesson. 

MATISSE STILL LIFE
1.) Introduce Matisse to the students. Show a short slideshow of his still lives. Ask kids what they noticed. What was similar about all these/how do we know it's the same artist? Make sure they notice: color palette, texture and patten elements, the thick black outlines in a lot of his work. 

2.) Set up still lives on each table. I used silk flowers in vases and fake fruit. Talk about how still lives were studies of composition, how an artist arranges objects on a page. 

3.) Hand out small sections of cut wrapping paper and have kids glue them down and cut off access to make their "tables".

4.) Kids draw still lives in thick black sharpies.

5.) When they're ready to paint, they can use tempera. (I use those little white round kids palettes with the wells all the way around.)
matisse still life art project for kids

matisse still life art project for kids

matisse still life art project for kids

matisse still life art project for kids

Thursday, November 8, 2012

October Art Lessons

I've decided to start blogging about the art lessons I'm doing with my students every month.  I teach 2nd and 3rd, and have recently added 1st grade as well.  I love to read other art teacher blogs, and thought I would add myself into the mix.  Maybe I can inspire a few other teachers out there! So look for lesson posts at the end of every month for some more ideas this year.  Hope you enjoy!

__________________________________________________________

TIM BURTON HAUNTED HOUSES
Tim Burton Haunted House kids art project

For my 3rd grade October lesson, we did haunted houses inspired by the art and movies of TIM BURTON! If you'd like to try this lesson, read on!

here's what you will need:
- yellow, purple and orange construction paper
- thin and thick line black pens (sharpies work well, just make sure to put scrap paper underneath kid's work areas... sharpies can bleed through and stain desks!)
- glue sticks
- (optional) a "Principles and Elements of Art" poster
Prep: 
- Cut yellow and orange sheets in half. Students only need half a sheet of one of these colors or their choice. 
Lesson:
- Introduce the principles and elements poster and explain that for each lesson, we will be learning about another principle or element of art.
- Introduce Tim Burton and give a super short bio (wikipedia him!).
-Show slideshow of a few Tim Burton character designs, art and scenes from his movies. Ask students to be thinking about what makes his art look like his art, but hold their comments till the end.
- Ask students what they observed during the slideshow.
- Go back to principles/elements poster and explain how Tim Burton uses "Positive and Negative Space".
Project:
- Talk with students about what makes a house look haunted. (Ex.: pointy shapes, tall and skinny house, ghosts, old and broken looking, etc.)
- Students cut out moon shapes out of their half sheets of orange or yellow paper and glue to the top of their purple sheets.
- Sketch their houses in pencil first
- Small details in skinny black pens, use thicker sharpies to fill in larger areas.
Tim Burton Haunted House kids art project

FOLK ART BLACK CATS
Folk Art Kids Art Lesson
For my 2nd grade October lesson, we did black cats inspired by FOLK ART! If you'd like to try this lesson, read on!

Here's what you will need:
- White paper
- Oil pastels
- Watercolors
Lesson:
- Introduce concept of Folk Art.  (Art that is usually made by indigenous cultures. Rather than “fine art” (art that goes in galleries) It is usually on useful items or for decoration (baskets, on pots, etc.). Usually they are not trying to make things look “real”.)
- Show slideshow of examples of Folk Art from around the world. Ask students to hold their comments till the end.
- Ask students what they observed during the slideshow.
Project:
- Tell students that there are a few rules for this project:
#1 They must draw a border on their pieces.
#2 They must draw the cat inside that border as big as they can fit it.
- Students draw in oil pastels, without coloring everything in.
- Paint over drawings with watercolors.


Folk Art Kids Art Lesson