Showing posts with label 1st grade art lessons. Show all posts

Sunday, May 5, 2013

Laurel Burch Inspired Cats - 1st Grade

Laurel Burch for First GradersLaurel Burch Cat Art Project for kids, 1st grade laurel burch project
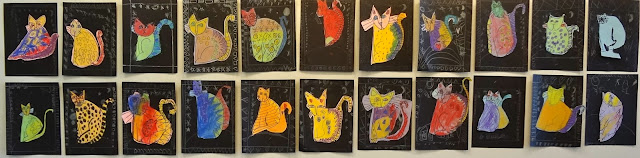
I was inspired by all the Laurel Burch projects I kept seeing on Pinterest lately, and thought that my own version of them would be perfect for my next lesson with the Holt Elementary first graders.  By the way, if you are an educator and haven't yet discovered Pinterest to help you plan your art lessons, you've been missing out!  If you need someplace to start, click here to see my board for kids art projects.  I've been collecting for quite awhile, so there's a lot of inspiration there :)  Anyway, on to the lesson!!  Since I only have my first graders for 30 minutes each time I see them, I broke this lesson down into 2 sessions.  If you have a good hour with your kiddos, this could be done all at once, as long as they don't get the wiggles too bad.

Materials for Day 1:
• Colored 9x12 construction paper (we used soft pink, blue and lavender)
• Sharpie markers, or something similar...the regular thickness
• Colored chalk or soft pastels

Materials for Day 2:
• black 9x12 construction paper
• white colored pencils or crayons

On Day 1:
- Introduce Laurel Burch to the kids - show a slideshow of her art, or bring in those cat earrings made from her art that you've had since the 80's!
- Lead a step-by-step drawing of a cat sitting down. (Kids work on the colored papers, with pencil first).  Start with a big letter "D", then add a cat's head with ears overlapping the top of the big "D".  Add nose, eyes, whiskers.  Show how to make the back leg, then draw a short vertical line down for the front feet. Add a tail.  
- Talk about PATTERN, and what exactly makes a pattern a pattern. Ask, "Is one circle a pattern?" No, it must be a REPEATING shape to be a pattern.  (Hitting those art benchmark words, eh? eh?) Have the kids draw patterns on their cats' backs. 
- Trace it all with sharpie.
- Color in with soft pastels or chalk, demonstrating first how they can use their fingers to blend gently.... then their sharpie lines show through! I didn't let my students use black or brown.... bright only!

On Day 2:
- On the black paper, have kids make a border to frame their cats, and draw patterns in the borders.
- Make a "hill" on the bottom, inside the border so the cat has a place to sit.
- Make a starry night sky with a moon and planets if they want, in the background above the hill.
- Cut out and glue the cats down!

The kids had a blast with these.... some were blowing kisses and naming their cats.  So. Stinkin. Cute.

Laurel Burch Cat Art Project for kids, 1st grade laurel burch project

Laurel Burch Cat Art Project for kids, 1st grade laurel burch project

Laurel Burch Cat Art Project for kids, 1st grade laurel burch project

Laurel Burch Cat Art Project for kids, 1st grade laurel burch project

Laurel Burch Cat Art Project for kids, 1st grade laurel burch project

Laurel Burch Cat Art Project for kids, 1st grade laurel burch project

Laurel Burch Cat Art Project for kids, 1st grade laurel burch project


Monday, April 22, 2013

Spring Bird Drawing Collage

Lately I've been teaching a residency at Dos Rios Two Rivers Elementary in Springfield.  We've been making some art for the kids to keep, and some to sell at the upcoming art walk (they're having a section for local schools to sell kid art to fundraise).  This is our last project, and I must say, they are turning out super cute!  I made these with Kinder through 5th graders, and adjusted for complexity, depending on grade level.  Read on to see how we made them!

spring art project, bird art project, kids spring art project, bird drawing project
Step #1: Lead a step-by-step drawing of a bird.  Start with pencil, trace with thick sharpie.  We actually had both the thick and thin sharpies available, so for the older kids, I had them outline in thick, and trace all the inside lines with the thinest sharpie. This looks really cool....see below.  

I had the littler kids draw birds like the above, and the older kids draw the more complicated tropical birds like you see below. With a couple of the classes, we opted for drawing chameleons instead of birds, which the kids really got into. Need to take some pictures of those....

spring art project, bird art project, kids spring art project, bird drawing project
Step #2:  Next, have the kids color these in with soft chalk pastels.  I told them no black brown, or the super dark blue (these covered up the sharpie lines, whereas the brighter, lighter colors don't).  Show them how they can blend them, and how the sharpie lines show up again when they do.  

spring art project, bird art project, kids spring art project, bird drawing project
..... No need to stay in the lines since they will be cutting them out anyways.

spring art project, bird art project, kids spring art project, bird drawing project
DAY 2: We did this next step the next day. We needed 2, 45 minute sessions to get through the whole project. The next step is to make some leaves and branches, cut out the birds, and paste it all together!! 

spring art project, bird art project, kids spring art project, bird drawing project

spring art project, bird art project, kids spring art project, bird drawing project

spring art project, bird art project, kids spring art project, bird drawing project

spring art project, bird art project, kids spring art project, bird drawing project

spring art project, bird art project, kids spring art project, bird drawing project


Wednesday, April 10, 2013

First Grade Self Portraits

First grade self portraits, kids self portrait lesson, kinder self portraits

I've been at Dos Rios/Two Rivers Elementary in Springfield all this week and last. We're making projects to take home, and some to sell at the Springfield First Friday Art Walk in May! This was their project that they were able to take home to their families: Self Portraits! For the older kids (grades 2-5) I did a more involved lesson on proportions of the face, colored with sharpie and tissue paper.... read that lesson by clicking here.  For the Kinders and first graders, we did this version you see in the pictures.  Read on to see how we did this lesson!

Supplies:
• Multicultural construction paper, cut in 6 x 9" sheets. 
• black sharpies
• colored pencils
• background colored construction paper, 9x12"
• Small-ish rectangles of pattern paper (we used both wrapping paper and contact paper)
• construction paper hair colors, cut into smaller pieces...half or quarter sheets. 
• glue sticks
• scissors

This can be done in 2, 30-minute sessions, or one longer one. 
• Day 1: Teach them suuuuper basic proportions of the face.  Just show that the eyes go in the middle of the face, and show some ways to draw eyes, noses and lips. The first day, just draw the faces on the multicultural skin color papers, trace drawings with sharpie, and add some colored eyes (and whites of the eyes!) lips, and cheeks with colored pencils. 
• Day 2: Put it all together: cut a "shirt" rainbow shape out of the patterned paper, cut out the faces, add torn paper for the hair. Glue, glue glue. Then watch the cuteness happen. Love these!!

First grade self portraits, kids self portrait lesson, kinder self portraits

First grade self portraits, kids self portrait lesson, kinder self portraits

First grade self portraits, kids self portrait lesson, kinder self portraits

First grade self portraits, kids self portrait lesson, kinder self portraits

First grade self portraits, kids self portrait lesson, kinder self portraits

First grade self portraits, kids self portrait lesson, kinder self portraits

Tuesday, February 12, 2013

First Grade Cityscapes

This lesson was the first grader version of this self portrait lesson that I did with all the older kids (grades 2-5) during my last residency.  I figured that we'd use all the same materials and techniques, just with a different subject matter.  Not that first graders couldn't do self portraits, but probably not the proportions lesson that I went through with the older kids. Anyway, here's what we did:

Materials:
• white paper
• star sequins
• sharpies in dark colors
• "bleeding" art tissue cut into small squares
• paper scraps for windows and half sheets of black (cut the long "hot dog" way)

1.) Have kids draw "space-y" things in sharpie on their white papers. Planets, spaceships, stars, etc. etc. Pretty cute to see what they come up with here. 

2.) Have them lay out their tissue paper squares over their drawings. Come around and spray water on the finished ones. Peel off tissue paper. If it's not colored enough, this process can be repeated, for a more saturated, layered effect. 

3.) When these are dry, show a couple cityscape examples and talk about shapes they could use for their skyline silhouettes. Hand out a half sheet of black to each kid and have them draw and cut out their city skylines in one piece if they can. Glue little windows onto them, and add sequins in the sky if you want. Super cute!

Cityscapes for First Grade

Cityscapes for First Grade

Cityscapes for First Grade

Cityscapes for First Grade

Cityscapes for First Grade

Thursday, February 7, 2013

Jim Dine Valentine's Day Art Lesson


There are a lot of Jim Dine inspired Valentine's Day art projects out there.... here is my version. Enjoy! This is a great lesson especially for littler ones (K-3), but 4/5ers have fun with it as well. 

Supplies:

• Oil Pastels
• black markers (we used sharpies)
• small pre-cut squares in whatever color (I think these are 4" x 4")
• red construction paper

Lesson:

• Talk about Jim Dine and the Pop Art movement (Pop Artists wanted to sort of rebel against abstract art, and start painting things that everyone could recognize - celebrity portraits, everyday objects, etc.)  Show some of his artwork, especially focusing the slideshow on his heart pieces!
• Have kids draw outlines and shading on hearts with markers. Show kids how to "cross-hatch" for the shading on the top of the heart. Emphasize the thick outline of the hearts.
• Color in little patches of colors in many colors of oil pastel all over inside and outside their hearts until they cover their whole squares.
• Once both squares are done, glue them both to the front of a card folded "hamburger style". Voila! They can write in them to someone in their families - (good opportunity for a writing assignment here!)

Happy Valentine's Day!
Jim Dine Valentine's Day Art Lesson

Jim Dine Valentine's Day Art Lesson

Jim Dine Valentine's Day Art Lesson

Jim Dine Valentine's Day Art LessonJim Dine Valentine's Day Art Lesson