Showing posts with label 5th grade art projects. Show all posts

Thursday, December 26, 2013

Perspective Lesson for Kids


The thing I love about tutoring kids in art, is that I can focus all of my attention on one student. I have the luxury of time and focus to making sure that my one student "gets" whatever we're working on. I can modify my lessons to suit their individual needs, wants and interests. Whatever she's into learning, I teach. Whenever she doesn't understand a concept, we back up and go slower. Ahhhhh how nice it is to only teach one kid at a time. And it helps that my student is a rockstar and a sweetheart. I will very much miss our tutoring sessions when I'm in Portland. Anyway, onto my student's favorite lesson. I was blown away that this was her favorite. Perspective had to be one of my least favorite classes of my entire college career. Didn't help that my Professor had a big rubber stamp that said, "DO OVER" that he used liberally with bright red ink on our homework assignments.... that took hours. Ugh! This lesson takes a little know-how and basic knowledge in perspective rules and techniques. But it's not that complicated. Here, I'll help:

One-Point Perspective for 4th grade and up:

1.) All you need is a paper and pencil for this one. 
2.) Give basic concept of perspective rules: Why do we use these "rules"? They help us build anything 3D on a 2D surface and make it look real. Talk about how things that are farther away are drawn smaller to trick the eye into making depth.... etc. etc.
3.) Draw a Horizon line. Talk about what this even means - it's where the sky separated from the Earth in the viewers point of view. 
4.) Draw a vanishing point. Or, if you're me, you call it "The Magic Dot". Explain that that thing is basically the point where things are so far away that they're out of view. You're making an interior, now, so draw a small rectangle, with your "orthogonal" lines as shown in the bottom picture. 
5.) Erase the horizon line. Use the Magic Dot to help build objects for your interior. Remember you will have vertical lines, horizontal lines, and the others will connect to the Magic Dot. You can even go into ellipses, and how they operate in Perspective. Give it a try. My Tutee rockstar student really got into this lesson. At first it's hard, then its freeing to know this amazing, amazing rule of drawing. Have fun!! 

Look at the amazing bakery interior that my student made!!!! Can you believe she's a 4th grader? So proud :)


perspective art lesson for kids

perspective art lesson for kids

Sunday, December 22, 2013

Environmental Posters with 4th and 5th Graders


Hello everyone!
So first and foremost, I have an announcement. In my last update post, I talked about how I was on the job hunt. Well, I found one! I'll be a Social Media Specialist and Graphic Designer for the Portland Jewish Academy in Portland, OR. I'm soo excited about this opportunity! I've been wanting to get up to Portland for awhile, since there's just so much going on there for artists. I've also been wanting to get into the Graphic Design field. It will be a great thing, I think. I'll be working half-time, but will be making enough to get by on. While of course I will need to be full-time, being able to pay my bills with part-time work initially, seems like a blessing. I'll be spending the rest of the work week trying to get my mural business off the ground in Portland. It takes a lot of time to do the networking/social media-ing/website building/business card-making, and all the rest that goes with promoting a small business. I'm excited to see what kind of new mural projects Portland will bring :) 

Since I'll be leaving Eugene in 2 weeks, I just finished my *LAST* school residency last week. This is really bitter-sweet. I have absolutely loved working for Lane Arts as a Teaching Artist. I've learned so much about teaching, and the kids have continued to make me laugh and inspire my own art work. If you are a teacher, please continue to follow my blog, as I hope to get on a teaching artist roster in Portland this coming Spring and will be posting more lessons as I create them. In the meantime, stay connected, as I'll be posting personal artwork and hopefully some mural projects as they happen. 

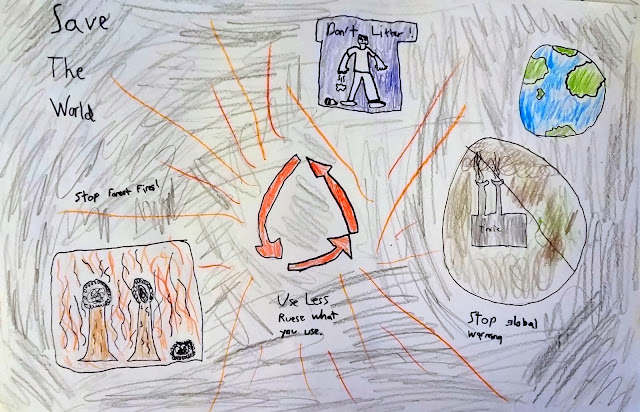
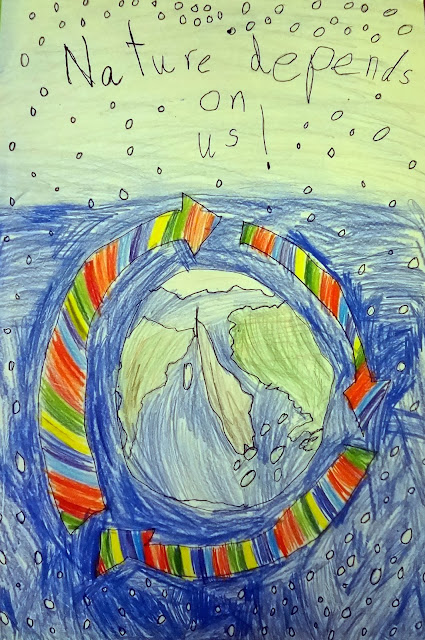
My last residency's theme was all about asking the question "Can art help save the Earth?". The 4th and 5th graders and I used that question as a base for our two weeks together during the after school program. We made a big mural with an environmental theme, and talked about how murals can be used to teach things to other people who view them, or express an opinion, or illustrate a concept. Because all 25 kids can't paint at the same time, we had other projects going while we rotated groups of painters. The poster project below was our first project. After introducing our "Big Question" about art saving the earth, we brainstormed some ways that we could use art in our own school, to help out the environment. We decided to make posters for the hallways and the bathrooms, that would help remind other kids (and teachers!) to use less water, less paper, etc. The kids could use any environmental theme they wanted though, so some of these turned out pretty funny. Anyway, I think they turned out adorable, and most of the kids really spent some time and effort on them. This would be a great Earth Day week project..... but really, do we need that as a reason? Every day can be Earth Day. :) Enjoy!

Environmental Poster project for kids, 4th and 5th grade earth day art project

Environmental Poster project for kids, 4th and 5th grade earth day art project

Environmental Poster project for kids, 4th and 5th grade earth day art project

Environmental Poster project for kids, 4th and 5th grade earth day art project

Environmental Poster project for kids, 4th and 5th grade earth day art project

Environmental Poster project for kids, 4th and 5th grade earth day art project

Environmental Poster project for kids, 4th and 5th grade earth day art project

Environmental Poster project for kids, 4th and 5th grade earth day art project

Sunday, December 15, 2013

Warm and Cool Colors "Imagination" Lesson

Hello, all! 

I promised some more lesson posts, and I'm starting with this one! I'm loving how these turned out. If you want to try this with your kids or students, keep reading!

SUPPLIES:
- tempera paints in a variety of colors
- something for the paint to go in - we used egg cartons
- multicultural construction paper (9 x 12 cut in half sheets)
- green paper
- Large (11 x 17) white paper and smaller (9 x 12) paper
- brushes, water cups

LESSON:

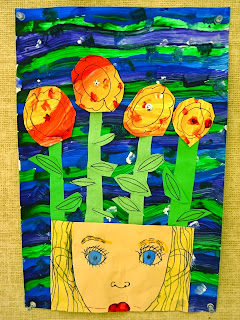
1.) Show an example that you've made of this pieces. Talk a little about conceptual illustration. Is this a picture that could really happen, or is someone using their imagination to create it? You could also show some surrealistic or conceptual illustration by other artists. Ask the kids what they think your piece is trying to "say". Why did you choose to have flowers growing out of your head? I got some interesting answers from my students: "It's about using your imagination", "Our minds are blooming", etc. They got it.

2.) Have a little talk about warm and cool colors...review them. They have a choice of having a warm background with cool flowers, or cool background with warm flowers - for contrast. Have them paint their background on the big sheet of white - just designs and patterns covering the whole paper. The smaller white sheet is to paint the flowers. They should also cover their smaller flower sheet in paint, since they will cut their flowers out of this. 

3.) They can then make stems and leaves out of the green paper, and cut out flower shapes out of their smaller painted paper. 

4.) We did a self-portrait lesson right before this lesson, so the kids already knew how to set up their guidelines for drawing their faces. They should choose their skin color out of a stack of the multicultural construction paper, and then draw a self-portrait on it. They can draw in pencil and trace in pen, and color in lips, hair and eye colors. 

5.) Glue everything together on the background paper! This whole process took us about 3, 45 minute sessions. And as always, some kids go through it super quickly, some very slowly, so plan other things for early finishers. But you knew that. Have fun!!

warm and cool colors art lesson for kids, 4th grade art lesson, 5th grade art

warm and cool colors art lesson for kids, 4th grade art lesson, 5th grade art

warm and cool colors art lesson for kids, 4th grade art lesson, 5th grade art

warm and cool colors art lesson for kids, 4th grade art lesson, 5th grade art

warm and cool colors art lesson for kids, 4th grade art lesson, 5th grade art

Wednesday, April 24, 2013

Dali Collage Art Project for K-5

When I was in High School, I was obsessed with Salvador Dali.  He is still one of my favorite artists!  I so was excited to show him to my 3rd graders!  Read on to see how we made our Dali collage art projects:

1.) Talk about it: Show a slideshow of some Dali artworks and have kids share what they observed about them. Ask, "Why do you think Dali got famous? What is he doing differently?" 
 Talk about “Surrealism” and how it is unique the way Dali painted realistically, but his subject matter was not realistic.  Ask the question "Do his paintings look real?" and you will get some "no" and some "yes" answers.  It's kind of a trick question.  He's painting things that are dreamy and not realistic, to look like they are actually real.  Tell your students they are going to make silly, dream-like pictures, using their imaginations and creativity.

2.) Give them magazines and/or cut out pictures from them (I was lucky enough to score a huge box of magazine pictures, most already cut out perfectly, from a local organization that collects and distributes and sells recycled art materials. MECCA, in Eugene, OR.)  Tell kids to pick 5 picture pieces only, arrange them on their paper, and glue them down.

3.) Give kids super fine sharpies, and let them "finish their pictures" and draw around the cut outs to create surreal situations.  No words, only pictures!

4.) Color with colored pencils. Voila!  Loving these.  Not the most aesthetically pleasing kids art project I've thought of, but it really exercises the creativity muscles, and gets them to think outside the box, and think silly.  It's super fun for them, too. Enjoy!!

~Corie 

Dali art project for kids, Dali collage project

Dali art project for kids, Dali collage project

Dali art project for kids, Dali collage project

Dali art project for kids, Dali collage project

Dali art project for kids, Dali collage project

Dali art project for kids, Dali collage project

Dali art project for kids, Dali collage project

Dali art project for kids, Dali collage project

Friday, February 8, 2013

Self Portraits With Borders!

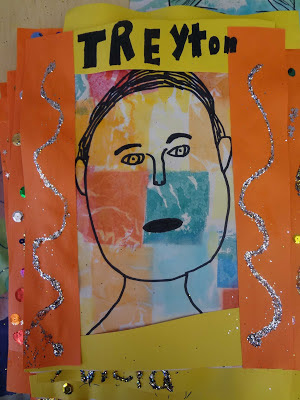
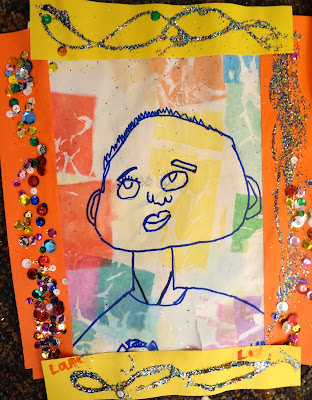
I just LOVED how these self portraits came out.  One of my favorite parts of doing an extended residency at a school, rather than a quick one day lesson or workshop, is the fact that there is so much more time to complete a project. These kids learned the proportions of the face, traced their portraits in sharpie, and colored them with bleeding art tissue paper all in one 45 minute session. (Check out the post on how to do that part here).  We let these dry, then the next day, were able to add and decorate these borders.  Sometimes it's worth it to just put out a bunch of fun materials that kids don't get to use very often, and see what happens. For our border sessions, I put out sequins, glitter (which I - along with every other teacher on the planet - have a love/hate relationship with), stamps, and markers. I told them they needed their names on them, but the rest was up to them to decorate. Oh man, those 2 days we finished this project, I could rest assured that each child was carrying glitter wherever they went just like the viciously infectious colds and flus going around. That stuff was EVERYWHERE. A kind teacher brought in a broom for me, and I (mostly) was able to take care of it. It was the chunky kind, so it sweeps. Just TRY to get the fine stuff off of something. I dare you. We had a great time with these. Below are a sampling of kids grades 2-5. 

Enjoy, and go bravely forward with glittering!

Kids Self Portrait Lesson

Kids Self Portrait Lesson

Kids Self Portrait Lesson

Kids Self Portrait Lesson

Kids Self Portrait Lesson

Kids Self Portrait Lesson

Kids Self Portrait Lesson

Kids Self Portrait Lesson

Tuesday, February 5, 2013

Monet Waterlilles Art Lesson

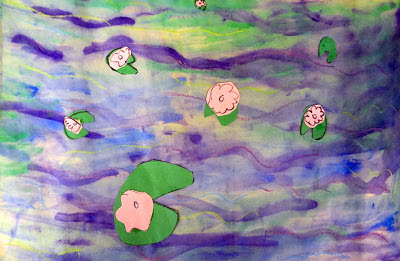
I just did this lesson last week for grades 1-5 and guess what? They ALL turned out cuter than cute!  I think this is a lesson that every student can be successful at.  That particular point is something I've been  trying to work towards in my lesson planning.  A good art lesson it seems, is simple enough that any student in the class can complete it and have it look decent.  It should also allow enough creative choices so that the more artistic students in the class can take the lesson and run with it.  Hard to balance, but I'm learning, slowly but surely.  This was a fun one.  And Monet is so classic you can't go wrong.  Here's how I did it:

Day 1: 
• Show pics of Monet's waterlillies - talk about THIS: Two inventions around the time of Monet really changed the art world and influenced what he was doing:
-#1: THE CAMERA - Now artists could branch out beyond super realism because a camera could do that for people now.  Hence, Impressionism. 
-#2: PAINT IN TUBES - Now, artists could bring their paint outside the studio, and paint out in front of their landscape subjects.
• Draw with COOL COLOR oil pastels (good opportunity to review the color wheel)...small strokes like monet, horizontal "water-y squiggles".
• Paint over it with COOL COLOR watercolors. 

Day 2:
• Explain basic PERSPECTIVE: Things get smaller as they get further away from you.  Their waterlillies should try to follow that rule. Have them make big, medium and small lilliepads and waterlillies out of construction paper, and arrange them with this perspective rule in mind, to give the pictures more depth.

Have fun!

Monet Art Lesson for Kids

Monet Art Lesson for Kids

Monet Art Lesson for Kids

Monet Art Lesson for Kids

Monet Art Lesson for Kids

Thursday, January 31, 2013

Paul Klee Inspired Self Portrait Lesson

Self portrait face proportions lesson for kids
Art Teachers loooove to do self portraits with kids.  This was a cool twist on the self portrait AND it involves art appreciation AND is much easier to clean up and set up than paint.  Perfect! Read on if you wanna do it too. 

You will need:
- white paper (duh)
- sharpies
- newspapers or something to protect desks from said sharpies
- bleeding art tissue paper, cut into small squares (craft stores)
- 1 or 2 spray bottle(s)

Lesson:

1.) Introduce Paul Klee...show slideshow of his work (especially ones with the colored squares).  Talk about how he was very interested in color theory - how colors relate to other colors around them. Ask kids to describe some of his paintings or share what they observed.

2.) Show how to draw a face in correct proportions. Have kids follow along with you as you draw on the board. They will draw all their guide lines in pencil. I learned about proportions of the face back in middle school and it's stuck with me. Here's a great, simple guide

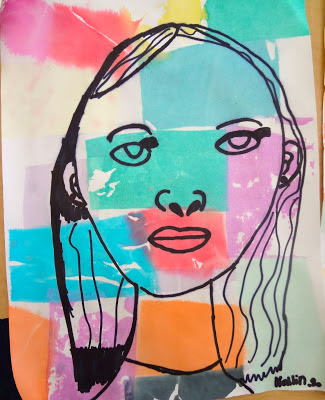
3.) Once they have their guidelines, students trace over ONLY their features and add details in sharpie. Make sure they're not tracing their guide lines. They don't really need to erase their pencil lines, because  once the paper gets wet, they disappear. Emphasize that all the details unique to them will be what makes their portrait look like them: freckles, how they part their hair, face shape, etc. 

4.) Pass out tissue squares and have them lay them all out how they want them, thinking about Paul Klee and his experiments with color relationships. Go around and spray each piece with water once kids have them all laid out. After a couple minutes, take off tissue paper and let dry. So cute, right??

These were done by 3rd graders:

Self portrait face proportions lesson for kidsSelf portrait face proportions lesson for kids

Self portrait face proportions lesson for kids

Self portrait face proportions lesson for kidsSelf portrait face proportions lesson for kids


Wednesday, January 30, 2013

Georgia O'Keefe Art Lesson Plan

Georgia O'Keefe Art Lesson Plan for Kids
 5th Grade Georgia O'Keefe Art
This is a go-to lesson for me and here's why:  This lesson works for any grade... really!  I've done this with Kinders up to 8th graders, and have found they all can be successful at it.  They turn out really nice and are great for brightening hallways, the kids learn about an artist and get an introduction to observational drawing. Read on if you want to see how I do it!

You will need:

- Assorted fake flowers - buy these once and you can use them for years!  Michaels always has sales on their flowers, too. 
- Oil Pastels or crayons
- Watercolor paints
- White paper.... big or regular sized... how much time do you have??

Lesson Plan:

1.) Introduce Georgia O'Keefe. Wikipedia some stuff about her life, and/or find a youtube video about her. There's tons of stuff out there. 

2.) Show pictures of Georgia O'Keefe's flower paintings. Ask the kids what they observe about them, and what they think she's doing differently from other artists. If you can get it out of them, you're looking for them to say she's painting them really big! Explain that part of what made her art famous, was that she painted flowers in EXTREME CLOSE-UP instead of the typical view of flowers in a vase on a table or something. 

3.) Talk about the difference between a CLOSED COMPOSITION and an OPEN COMPOSITION. (Closed means nothing's going off the page and everything's contained in the picture boundaries, Open composition is the opposite). Explain that they will be doing an Open Composition today.  Show them your example, and tell them there's one rule when they're drawing their flowers: Their flower must be SO BIG that it touches at least 3 SIDES OF THEIR PAPERS. This is a hard one for some kids to get.... a lot of kids tend to want to draw everything tiny. This is a good stretch for some, and gets them out of their comfort zones. 

4.) Hand out art supplies and work!  Give each kid one of the fake flowers to draw.  If you're working with older kids, remind them to look for color variations and tiny details and shapes they might see in their flowers - work on those observation skills!! Draw first in oil pastel, cover with watercolors. You might emphasize the use of a contrasting color in the background to really "pop" their flowers.

5.) Let dry, then hang up somewhere boring that needs some LIFE and COLOR!

Georgia O'Keefe Art Lesson Plan for Kids
3rd Grade Georgia O'Keefe Art
Georgia O'Keefe Art Lesson Plan for Kids
3rd Grade Georgia O'Keefe Art
Georgia O'Keefe Art Lesson Plan for Kids
5th Grade Georgia O'Keefe Art
Georgia O'Keefe Art Lesson Plan for Kids
3rd Grade Georgia O'Keefe Art
Georgia O'Keefe Art Lesson Plan for Kids
5th Grade Georgia O'Keefe Art
Georgia O'Keefe Art Lesson Plan for Kids
5th Grade Georgia O'Keefe Art