Thursday, January 31, 2013

Paul Klee Inspired Self Portrait Lesson

Self portrait face proportions lesson for kids
Art Teachers loooove to do self portraits with kids.  This was a cool twist on the self portrait AND it involves art appreciation AND is much easier to clean up and set up than paint.  Perfect! Read on if you wanna do it too. 

You will need:
- white paper (duh)
- sharpies
- newspapers or something to protect desks from said sharpies
- bleeding art tissue paper, cut into small squares (craft stores)
- 1 or 2 spray bottle(s)

Lesson:

1.) Introduce Paul Klee...show slideshow of his work (especially ones with the colored squares).  Talk about how he was very interested in color theory - how colors relate to other colors around them. Ask kids to describe some of his paintings or share what they observed.

2.) Show how to draw a face in correct proportions. Have kids follow along with you as you draw on the board. They will draw all their guide lines in pencil. I learned about proportions of the face back in middle school and it's stuck with me. Here's a great, simple guide. 

3.) Once they have their guidelines, students trace over ONLY their features and add details in sharpie. Make sure they're not tracing their guide lines. They don't really need to erase their pencil lines, because  once the paper gets wet, they disappear. Emphasize that all the details unique to them will be what makes their portrait look like them: freckles, how they part their hair, face shape, etc. 

4.) Pass out tissue squares and have them lay them all out how they want them, thinking about Paul Klee and his experiments with color relationships. Go around and spray each piece with water once kids have them all laid out. After a couple minutes, take off tissue paper and let dry. So cute, right??

These were done by 3rd graders:

Self portrait face proportions lesson for kidsSelf portrait face proportions lesson for kids

Self portrait face proportions lesson for kids

Self portrait face proportions lesson for kidsSelf portrait face proportions lesson for kids


Wednesday, January 30, 2013

Georgia O'Keefe Art Lesson Plan

Georgia O'Keefe Art Lesson Plan for Kids
 5th Grade Georgia O'Keefe Art
This is a go-to lesson for me and here's why:  This lesson works for any grade... really!  I've done this with Kinders up to 8th graders, and have found they all can be successful at it.  They turn out really nice and are great for brightening hallways, the kids learn about an artist and get an introduction to observational drawing. Read on if you want to see how I do it!

You will need:

- Assorted fake flowers - buy these once and you can use them for years!  Michaels always has sales on their flowers, too. 
- Oil Pastels or crayons
- Watercolor paints
- White paper.... big or regular sized... how much time do you have??

Lesson Plan:

1.) Introduce Georgia O'Keefe. Wikipedia some stuff about her life, and/or find a youtube video about her. There's tons of stuff out there. 

2.) Show pictures of Georgia O'Keefe's flower paintings. Ask the kids what they observe about them, and what they think she's doing differently from other artists. If you can get it out of them, you're looking for them to say she's painting them really big! Explain that part of what made her art famous, was that she painted flowers in EXTREME CLOSE-UP instead of the typical view of flowers in a vase on a table or something. 

3.) Talk about the difference between a CLOSED COMPOSITION and an OPEN COMPOSITION. (Closed means nothing's going off the page and everything's contained in the picture boundaries, Open composition is the opposite). Explain that they will be doing an Open Composition today.  Show them your example, and tell them there's one rule when they're drawing their flowers: Their flower must be SO BIG that it touches at least 3 SIDES OF THEIR PAPERS. This is a hard one for some kids to get.... a lot of kids tend to want to draw everything tiny. This is a good stretch for some, and gets them out of their comfort zones. 

4.) Hand out art supplies and work!  Give each kid one of the fake flowers to draw.  If you're working with older kids, remind them to look for color variations and tiny details and shapes they might see in their flowers - work on those observation skills!! Draw first in oil pastel, cover with watercolors. You might emphasize the use of a contrasting color in the background to really "pop" their flowers.

5.) Let dry, then hang up somewhere boring that needs some LIFE and COLOR!

Georgia O'Keefe Art Lesson Plan for Kids
3rd Grade Georgia O'Keefe Art
Georgia O'Keefe Art Lesson Plan for Kids
3rd Grade Georgia O'Keefe Art
Georgia O'Keefe Art Lesson Plan for Kids
5th Grade Georgia O'Keefe Art
Georgia O'Keefe Art Lesson Plan for Kids
3rd Grade Georgia O'Keefe Art
Georgia O'Keefe Art Lesson Plan for Kids
5th Grade Georgia O'Keefe Art
Georgia O'Keefe Art Lesson Plan for Kids
5th Grade Georgia O'Keefe Art


Saturday, January 19, 2013

Pop Art Lesson with 3rd Grade

I love using Pinterest for many reasons.  It satisfies a need for stimulation without having to really think about anything.  Almost calming in it's chaos.  Pinterest is where I got my AMAZING recipe for St. Patty's Guiness and Bailey's infused cupcakes (almost time to bust that one out again!).  I love it.  If you're a teacher or an art teacher and on Pinterest, you know the abundance of lesson plan ideas on there.  You've probably come across those Kandinsky circle projects about 1000 times.  Usually, I like to tweak the lesson plan ideas I get from there, combining with other lessons, adding or subtracting certain materials, etc.  But this lesson is straight-up Pinterest, with a bit of added art school/art history flair from me. The original link can be found here.  

Pop Art Mugs
Supplies:

• Big white construction paper (12 x 18")
• Oil Pastels 
• Watercolors

Lesson:

1.) Discuss "Pop Art" (short for "Popular Art") movement.  It was the late 1950's, early 60's response to the early 50's Abstract movement.  Pop artists did not care for abstract art; they wanted to produce art that actually looked like something.  Pop Artists starting producing art that contained consumer products, comics, mass media and advertising - things that everyone would recognize.

2.) Show some pictures of Pop Art: Andy Warhol, Wayne Theibaud, Roy Lichtenstein, etc. Ask kids for their observations.  Note that Warhol often repeated images over and over, though slightly tweaked each time. 

3.) DEMO and work time!: Show how to draw an ellipse correctly - no pointed sides, only rounded! Show how to draw a cup with the sides angling inwards and the bottom also ROUNDED and not flat. Explain how the oil pastels will resist the watercolor, so they should not be filling in areas with their oil pastels, rather drawing patterns.  They should leave their cups blank with no designs.  Lead students through folding their paper to get 6 even sections, then outlining fold lines with black pastel. Draw a cup in each section, with a table underneath it. Make patterns in each area, except cups. Fill in areas with watercolor. Voila! Pop Art cups. These turned out really beautiful and we only had a 45 minute class to complete the entire lesson and project! 


Thursday, December 20, 2012

It's finished...and only just begun.


I got written up in the local newspaper today for my latest project!  It came out in papers today and was well-written and thorough.  Read the article here.  

The pilot project is almost complete! And I say "almost" because even though our part of the mural is finished, it still has a long way to travel to get to its final destination.  I will ship out the mural this weekend. I just got an email from the Peace Corps Volunteer who will receive it for his village.  He says:

Hey Corie,
The painted mural looks awesome!  We're really lucky to have that coming to Tsivangiana.  Last week I met with a group of five mpanentanas (health workers/informers) there.  We plan to use the mural to launch a week of malaria trainings - on bed nets (we're going to go house by house and check bed net usage, take pictures of people there doing it right and wrong, and put these next to the mural as examples - like a Wall of Bed Net Fame) and on making Neem Cream (a natural bug repellant).  We haven't yet finalized the programme/dates but we're looking at maybe the last week in January.  I will let you know.  The ladies (the mpanentanas) are really mazoto (diligent) so I think it's going to be great.  We'll try to get the most out of this great mural you all have made!  And yes we'll make sure to send you all lots of pics.   
Thanks,
Eddie  

So awesome!! I feel overwhelmed with... I guess the word is satisfaction.  It's the same feeling as when I've had a painting in my head for ages, finally paint it, and it comes out just right or better than I imagined.  I dare say, I feel proud of myself.  I also feel very grateful to those who helped me get all this together.  My whole Peace Corps family was so willing to jump in and help: other volunteers, my former supervisor and language teachers there.  My expert muralists I learned this cloth-mural technique from over the summer at my internship with the Philadelphia Mural Arts Program.  My friends and family here listened to me and helped me sort through ideas.  Thank you all so much!!!

The pilot project went great.  Now it's sort of like, what's the next logical step for this thing?  I hope to do more of these with more schools in Eugene and Portland (next school year).  Then, who knows..... maybe someday this can become my J.O.B. through some big health organization (COUGH*Population Services International*COUGH) so kids in the U.S. can make health murals for places all over Africa or the rest of the developing world.  For now, I'm reveling in my first victory. But.... "Dream Big", right? 

I'll leave you with some visuals:

Madagascar Mural Collaboration

Madagascar Mural Collaboration

Madagascar Mural Collaboration

Madagascar Mural Collaboration
Our mural: 
Panel 1.) washing the mosquito net with regular soap instead of detergent. 
Panel 2.) Hanging it in the shade to dry (so it doesn't lose it's mosquito repellent). 
Panel 3.) tuck it in really good under your mattress. 
Panel 4.) Fix any holes in the net. 
This was the original mural design. The folks in the village in Madagascar will be the ones to finish the border and the words in Malagasy, explaining each panel. 

Thanks for reading,

Corie

Friday, December 14, 2012

Two lessons in Perspective

Today, I learned of the massacre of the children at Sandy Hook Elementary in Newtown, CT.  I don't know what to write after that sentence.  The faces of the 2nd and 1st graders I teach keep coming to mind.  Their tiny voices, shiny hair, uninhibited grins.  Big people are supposed to protect the little people in this world.  It hurts my heart to think about it too hard.

It's a lesson in perspective whenever something this tragic happens.  I have my family, my friends, my work, my mental and physical health, my... everything.  It makes every current worry seem so much less important.

I'm not going to go on about gun control or health insurance for the mentally ill, not here in this blog-space.  This space is about bringing positivity into the world and into children's lives through art.  Read on if you'd like to learn about a lesson in a different kind of perspective. 

BAOBABS PERSPECTIVE LESSON
(Best for grades 3-8)
This lesson was a part of the Madagascar Mural Collaboration residency that I did with 4th graders last week (the previous blog post has all that info).  This was the second big art project that we worked on in the classroom, while small groups were painting the mural.

Baobabs Tree perspective lesson for elementary students

Baobabs Tree perspective lesson for elementary students

Baobabs Tree perspective lesson for elementary students

Baobabs Tree perspective lesson for elementary students

Baobabs Tree perspective lesson for elementary students
Supplies:
-Watercolor sets and brushes
-Black and white tempera paint
-Background paper (we used watercolor paper taped to brown construction paper)

Day 1:
1.) Introduce students to Baobabs through pictures and/or youtube video. I like this one.
2.) Have kids describe in words what the shape of a baobab tree is like. How are they different from other trees? (wide, curved trunks, branches only at the very top and spreading outwards, etc.)
3.) Have kids paint sunsets with watercolors covering their whole papers. Let dry.

Day 2:
1.) Explain perspective to the kids. Things that are closer to you will look bigger and darker. Things that are further away will look lighter and smaller.  Explain that today, they will be painting the baobab trees that are furthest away in their pictures.
2.) Mix up some grey tempera paint. Have kids outline their baobabs in pencil first.
3.) Have kids paint in their baobab trees and some of the ground with the grey paint.

Day 3:
1.) Have kids paint the closer baobabs in black tempera. Explain perspective again, emphasizing that they should paint these trees a little bigger than the last ones.  Make sure they know it's ok if their trees overlap each other some. 
2.) Now put them up and talk about how awesome they are! 

Tuesday, December 11, 2012

Madagascar Mural Collaboration Residency: Days 1-3

Well, it's FINALLY HAPPENING!!!  After coming up with the idea in August, sending many emails back and forth between continents, researching materials, planning lessons, talking to school administrators and teachers and getting a grant funded to pay me for teaching time, I FINALLY got to do my Madagascar Mural Collaboration art residency! 

In case you missed previous blogs about this, click here to read about the forming of the idea, or read the rest of this paragraph.  This all started last Summer, when I did an internship with the Mural Arts Program in Philadelphia.  There, I learned that you can paint on a specialized fabric and then install it on any wall you want.  I have been working in schools doing residencies that involve painting murals permanently on the school wall(s).  But after learning this new technique, I had the idea to have my students paint a mural on this special fabric then ship it to Madagascar (where I was a Peace Corps Volunteer 2008-2010) to be installed.  There has been a recent push for Peace Corps Volunteers to organize the painting of murals in their villages that double as public art and health teaching tools around the subject of Malaria prevention.  The mural I am having the students paint is based on care and proper use of mosquito nets (a form of Malaria prevention).  When it arrives, a current Peace Corps Volunteer will install this mural on the wall of the hospital in their village.  There is text on the mural explaining the pictures, but the pictures are really important because of the high illiteracy rates in the rural village.  We left some pieces of the mural unfinished, so that the villagers who will eventually have it on their hospital, can finish it.  This makes the project a collaborative mural between American and Malagasy people.    

This Madagascar art residency was done with almost 90 4th graders at Holt Elementary School over the last 7 days.  During this week, we have been studying Madagascar, doing art lessons related to the country's flora/fauna, and working on the mural.  

Before beginning the residency, I showed kids a little slideshow with some basic facts about Madagascar, and some pictures I took while I was there....followed by a long Q&A session with the kids.  I got, "How do they go to the bathroom?" "What was the weirdest thing you ate there?" "Were you scared all the time?" etc. 

The first day, we made "passports".  These were just little blue and white construction paper booklets that acted as the kid's journals for the residency.  Every new fact, and every new Malagasy word they learned, got written in their passports.  They even drew eagles on the front, and filled out their info on an inside page, complete with tiny self-portrait "passport photos".  Super cute. 

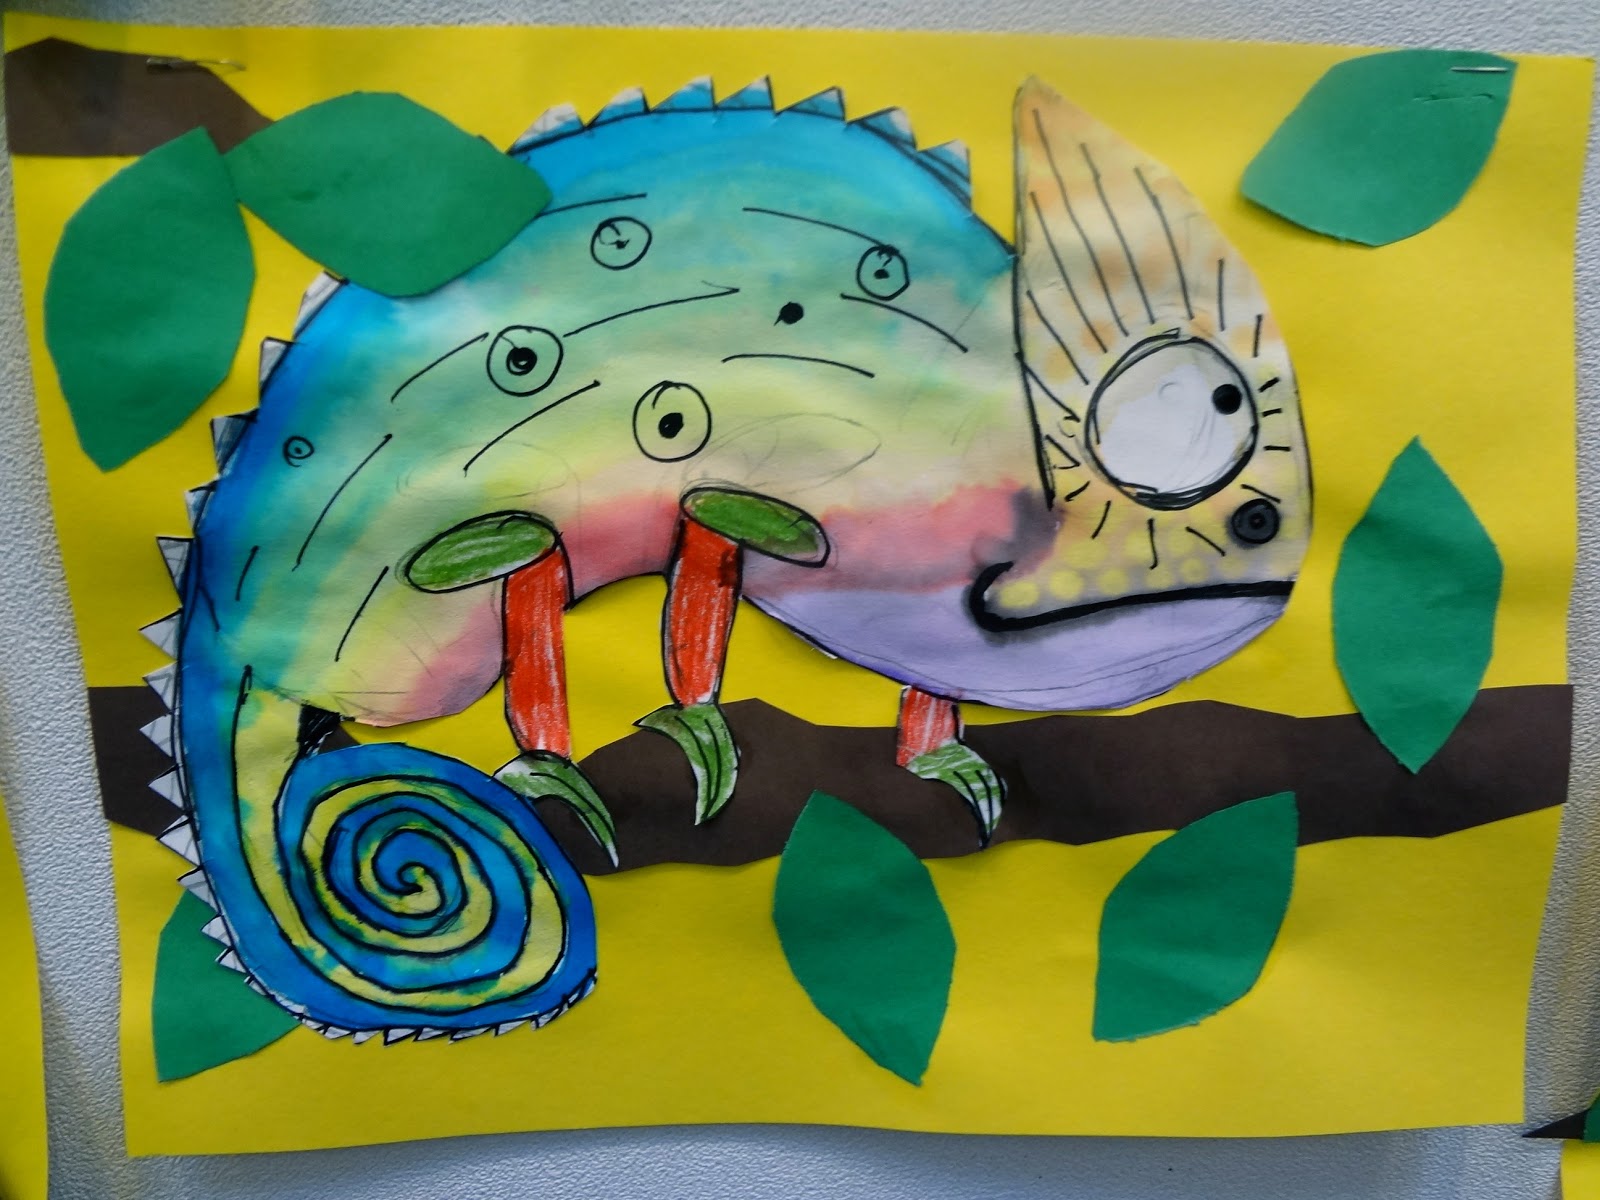
The first 3 days of the residency, after making the passports, we did an art project about chameleons.  All kids worked on their chameleons in the classroom, while I periodically pulled a few kids aside to work on the mural.  If you want to learn how to do the chameleons lesson with your kids or students, read on! 

CHAMELEONS LESSON:

You need:
-watercolor sets and brushes
-yellow construction paper, brown strips of paper, half sheets of green paper
-skinny black "Teacher Pens" as the kids call them. (Felt tip markers)

Day 1:
(The first day, we spent half the class making passports, so this part and the Day 2 step may actually be combined).  This day, we did a step-by-step follow along drawing of a chameleon in pencil on white paper. The kids draw, as you draw. Show them how to make a "jelly bean" shaped body, then add a triangle head, legs, back spikes, etc.

Day 2:
This day, break out the watercolors, and have the kids paint those suckers. Show some pics of real chameleons to get them inspired by their colors, patterns, etc.  These have to dry overnight.

Day 3:
Outline and draw designs on them with the felt tip pens.  Cut out the chameleons.  Use the brown strips and green half sheets to make leaves and branches.  Have them arrange everything on the yellow backgrounds, and paste down.  Remind them that it will help make things look more dimensional if they overlap a few leaves on top of their chameleons.  Done and DONE!  So cute, right?!
Chameleons kids art project

Chameleons kids art project

Chameleons kids art project

Chameleons kids art project

Chameleons kids art project

Chameleons kids art project

Chameleons kids art project

Chameleons kids art project

Chameleons kids art project

Chameleons kids art project

Chameleons kids art project

Chameleons kids art project

Thanks for reading, and check back soon for the rest of the week's Madagascar projects!

Corie

Sunday, December 2, 2012

Van Gogh's "Starry Night"....2nd grader style!

November lessons continued: Van Gogh's "Starry Night" with 2nd grade 

This is probably my favorite lesson from November, and one of my top favs for the lower grades. The kids loved it and I think they turned out adorable and beautiful! I combined a couple different things I saw on Pinterest for this lesson plan. If you want to know exactly how to do my version of this lesson, read on!

Materials:
• 11 x 17 white construction paper
• blue, purple and yellow tempera paints and brushes
• black and yellow construction paper

1.) Talk to the kids about Van Gogh. Make a point that he only ever sold like ONE painting in his lifetime....to his brother! Now his paintings are worth millions. Kids get a kick out of that. You can emphasize that they should try not to be discouraged, and that if they're doing what they love, it will be worth it all. I dunno, I thought this was a good life lesson somehow, even if it's a sort of depressing fact about Van Gogh's struggle of a life. 

2.) Show some of Van Gogh's paintings and end with "Starry Night". Have kids describe it. Make sure you emphasize his short, numerous brush strokes or "dots" of color - he didn't blend, just placed colors next to each other. This will be the important part to talk about, since it's what the kids are about to do.

3.) Give kids blue, purple and yellow tempera paints in those little white plastic palettes. 1 per table group works fine. 

4.) Do this as a "follow along" painting. Under the document camera, paint along with the kids. First tell everyone to do yellow stars and moons in their sky. Follow that with painting blue swirls around them (but not blending into the stars, that would make a green mess, PLUS, explain again that Van Gogh only placed colors next to each other without blending). Then, fill in all the extra spaces with the purple, using short, small brush strokes like Van Gogh. Leading the kids through this painting process will make their skies turn out better, and they will all look completely different anyways. :)

5.) NEXT DAY: After their skies have dried, hand out sheets of black and half sheets (or smaller) of yellow paper. Show "Starry Night" again and show how there's some trees and some city in there. Have kids make half trees and half buildings with their black. Then they can cut out yellow windows to add to their buildings or houses. Glue it all to the backgrounds. Done!! 

LESSON AFTERTHOUGHT: After each lesson, I learn a lot and sometimes have new ideas for how I would do the same lesson the next time. I think this lesson could work REALLY well if done with oil or chalk pastels on dark blue paper. Wouldn't that be gorgeous? Plus, you wouldn't have to wait till the next day to finish, since there's no drying time! Must try that next time!!

Talking Walls art with kids: Starry Night for 2nd grade

Talking Walls art with kids: Starry Night for 2nd grade

Talking Walls art with kids: Starry Night for 2nd grade

Talking Walls art with kids: Starry Night for 2nd grade

Talking Walls art with kids: Starry Night for 2nd grade

Talking Walls art with kids: Starry Night for 2nd grade

Talking Walls art with kids: Starry Night for 2nd grade

Talking Walls art with kids: Starry Night for 2nd grade